Events
This section will define different types of events and provide information on their usage.
Overview
An event is something that happens during the execution of a process and has an impact on the flow.
An event alters the sequence or timing of activities in a process.
Some events have a trigger, such as a timer, message, signal, error, manual trigger or API call.
There are three types of event: start, end, and intermediate. A start event is at the start of a process flow, and an end event is at the end of a flow.
An intermediate event is an element in a flow of the diagram or is attached to the boundary of a task or call activity.
The following table shows the events that you can use in a process diagram. Events that can be set as boundary events are marked (B). A non-interrupting time can only be set as a boundary event (B only):
| Trigger | Start | Intermediate | End |
|---|---|---|---|
none |
start |
catch link, throw link |
end, terminate end |
message |
start message |
catch message (B), throw message |
end message |
timer |
start timer |
timer (B), non-interrupting timer (B only) |
|
signal |
start signal |
catch signal (B), throw signal |
end signal |
error |
start error |
catch error (B) |
end error |
Timer events
Timer events are used to:
-
Start a process on a repeating schedule, at a fixed date and time, or after a specified interval (start timer)
-
Delay a process for a set amount of time or until a specific date and time (intermediate timer)
-
Count down during a task until a deadline is reached (boundary timer or non-interrupting boundary timer)
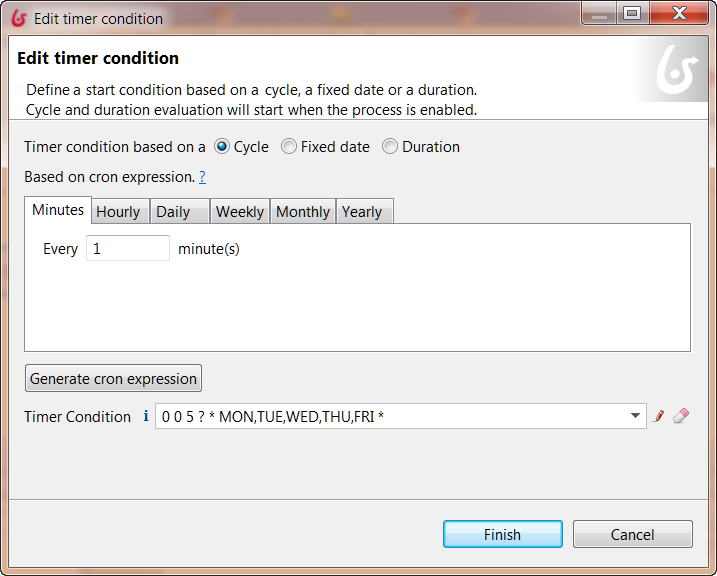
There are three types of timer condition:
-
Cycle, which triggers the event on a recurring schedule (available for Start timer events only)
-
Fixed date, which triggers the event at a specified date and time
-
Duration, which triggers the event after a specified delay
A timer event can also contain conditions that trigger actions using connectors.
Start timer
Use a start timer to launch a process on a repeating schedule (cycle), at a fixed date and time, or after a specified delay (duration).
To set the schedule, select the start timer event, go to the Details panel, General tab, General pane, and click Edit… to set the timer conditions.
If you define a condition based on a duration, the countdown to the process start begins when the process is enabled.
Intermediate timer
Use an intermediate timer as a delay mechanism to pause a process flow until a specified duration has elapsed or a specified date and time is reached.
To define the duration or the end of the delay, select the intermediate timer event, go to the Details panel, General tab, General pane, and click Edit… to set the timer conditions.
Boundary timer
Use a boundary timer to set a deadline by which an activity should end. You can set a boundary timer on a human task or a call activity. If the activity is not executed before the deadline, the timer is triggered and it diverts the normal process flow to an exception flow. For example, you can use a boundary timer to escalate a late task. The deadline can be set as a duration (for example 48 hours) or as a specific time and date.
To define the deadline, select the intermediate timer event, go to the Details panel, General tab, General pane, and click Edit… to set the timer conditions.
Non-interrupting boundary timer
Use a non-interrupting boundary timer to start an exception flow that parallels the normal process flow. You can set a non-interrupting boundary timer on a human task or a call activity.
You can define the deadline as a delay (duration) or a fixed date.
If the activity does not start before the deadline, the timer is triggered and it starts the exception flow. The normal process flow continues. For example, you can use a non-interrupting boundary timer to trigger a reminder to a user that a task is waiting to be performed.
To define the deadline, select the non-interrupting boundary timer, go to the Details panel, General tab, General pane, and click Edit… to set the timer conditions.
Message events
A message is used to send information from one process to another and as a synchronization point. A message can contain data.
A message is a point-to-point communication, that is, it is sent to a specified task in a specified pool, where the recipient is
configured to receive the message. It is also possible to use signals for communication between processes: a signal is broadcast so can have many recipients and does not contain data.
A message that is sent has always one recipient. To ensure that the messages are sent between the correct process instances, and to verify the validity of the message, you can use key-based correlation.
Reminder: As an alternative to a message, you can use a gateway as a synchronization point in your process. There is a performance advantage to using a gateway in place of a message and called processes.
To replace messages with gateways, you need to restructure your process diagram.
There are five events related to messages, described in the following sections.
Throw message event
Use a throw message event to send a message to an element in a different process.
A message can be caught by an intermediate catch message event, a boundary catch message event on a task, or a start message event.
To configure a throw message event, select it in the diagram, go to the Details panel, General tab, Messages pane, and define the message that can be thrown. For each message, specify the following:
-
The message name. You use this name to identify the message when you configure the message catching element, so a unique, descriptive name is best.
-
The target pool. This identifies the target process. When you start to enter the target pool name, Bonita Studio offers a list of the pools in diagrams you currently have open. Double-click a name to select it from the list. You can also specify the name of a process that is defined in a diagram that is not currently open or that is in a different workspace.
-
The target task. This is the name of the task or event that is listening for the message.
-
The correlation level. If you want to use key-based correlation, specify the keys and their values. Define the value of a correlation key using the Expression Editor.
-
The message content. The message content is a collection of id-value pairs. The simplest method is to use the relevant process variables, but you can use an expression to create message content in other formats. The Content item is the id and must be a string. The Content value must be serialized, so that it is kept in the database and persists even after a JVM restart.
It can be contructed with a script or variable. it can also be a complex datatype as long as all its attributes are serializable. This value must not be longer than 255 characters.
If the source and target of the message are in the same diagram, they will be connected by a dotted line.
Catch message event
Use a catch message event to receive a message from another process. A catch message event can be an intermediate event, used to pause
the process flow until the message arrives, or can be a boundary event on a task, used to divert process flow into an exception path if the message arrives.
A message can be sent by a throw message event or an end message event.
To configure a catch message event, select it in the diagram, go to the Details panel, General tab, and specify the following:
-
In the General pane:
-
Specify the event name. This name is used when configuring a throw message event to identify the target of the message.
-
Specify the name of the catch message. This is the name of the message that is configured in the throw message event.
-
-
In the Message content pane, specify how to handle the content of the message. If the message content is based on variables in the sending process and you have variables with the same name in the receiving process, you can click Auto-fill to indicate that the values of the variables in the receiving process are to be set to the values in the message. Otherwise, you can define a set of mapping rules.
-
Specify the correlation checks required. If the correlation keys for the message are already defined, click Auto-fill to add them to the table. You can modify these correlation keys, or define others.
Start message event
Use a start message event to start a process when a specified message is received.
To configure a start message event, select it in the diagram, go to the Details panel, General tab, and specify the following:
-
In the General pane:
-
Specify the event name. This name is used when configuring a throw message event to identify the target of the message.
-
Specify the name of the catch message. This is the name of the message that is configured in the throw message event.
-
-
In the Message content pane, specify how to handle the content of the message. If the message content is based on variables in the sending process and you have variables with the same name in the receiving process, you can click Auto-fill to indicate that the values of the variables in the receiving process are to be set to the values in the message. Otherwise, you can define a set of mapping rules.
-
If you are configuring a start message event in an event subprocess, specify the correlation checks required. If the correlation keys for the message are already defined, click Auto-fill to add them to the table.
You can modify these correlation keys, or define others.
The version of the target pool is not specified in the message definition. If you deploy and enable two versions of a process and each is started using the same start message event, when the message is thrown only one process is started and not necessarily the more recent one. To avoid this problem, do not have more than one version of your process enabled.
End message event
Use an end message event at the end of a process to send a message to an element in a different process.
A message can be caught by an intermediate catch message event, a boundary catch message event on a task, or a start message event.
To configure an end message event, select it in the diagram, go to the Details panel, General tab, Messages pane, and define the message that can be thrown. For each message, specify the following:
-
The message name. You use this name to identify the message when you configure the message catching element, so a unique, descriptive name is best.
-
The target pool. This identifies the target process. When you start to enter the target pool name, Bonita Studio offers a list of the pools in diagrams you currently have open. Double-click a name to select it from the list. You can also specify the name of a process that is defined in a diagram that is not currently open or that is in a different workspace.
-
The target task. This is the name of the task or event that is listening for the message.
-
The correlation level. If you want to use key-based correlation, specify the keys and their values. Define the value of a correlation key using the Expression Editor.
-
The message content. The message content is a collection of name-value pairs. The simplest method is to use the relevant process variables, but you can use an expression to create message content in other formats.
Signal events
A signal is used to send a notification from one process to another. A signal does not contain data. A signal is a broadcast so can have multiple recipients.
There are four events related to signals:
-
Throw signal: issues a signal.
-
Catch signal: catches a signal. Can be an intermediate event or a boundary event. An intermediate catch signal causes the process to wait until the signal is received. A boundary catch signal event causes the process to abort the step to which it is attached when the signal is received.
-
End signal: ends a process and sends a signal. Configured in the same way as a throw signal event.
-
Start signal: catches a signal and starts a process. Configured in the same way as a catch signal event.
Signal event configuration
To configure a signal event, select the element in the diagram, go to the Details panel, General tab, General pane, and specify the content of the signal in the Signal field. The signal content is a string. Either enter the string in the form field, or select it from the list of signals already defined.
Error events
A error is a notification of an exception that diverts the normal process flow to an exception flow. There are three types of error event:
-
A catch error event is a boundary event that is thrown if an error occurs during a task or call activity. It stops the normal process flow and diverts the process to an exception flow.
-
An end error event marks the end of a process branch that corresponds to an exception. A error code is sent to an event subprocess exception handler. Other flows in the process that are not in error remain active.
-
A start error event marks the start of a error event subprocess.
Catch error event
Use a catch error event as a boundary event on a task or call activity to trigger an exception flow if an error occurs.
You can specify a particular error to be caught, or catch all errors.
A boundary error on a service task indicates an internal fault where the service cannot finish due to a technical problem, for example, a failed connector, lost communication links, or invalid data. This is a technical exception.
A boundary error on a human task indicates a user-declared exception, for example, where a human action such as ticking a checkbox can indicate there is a problem.
To configure a catch error event, select the element in the diagram and specify the name of the associated error. If no error is specified, the event will catch any error returned during the task or call activity called process.
Then create the exception flow out of the boundary error.
Start error event
A start error event can only be used to start an error event subprocess. The start error event catches the error from an end error event and starts the event subprocess.
To configure a start error event, select the element in the diagram, go to the Details panel, General tab, general pane, and specify the error. If you do not specify an error, the event subprocess is started for all any error in the parent process.
End error event
Use an end error event to start an event subprocess exception handler when a given error occurs. Note that an end error ends a branch of the process flow but other flows in the process continue.
To configure an end error event, select the element in the diagram, go to the Details panel, General tab, general pane, and specify the error. There must be a corresponding event subprocess configured to start with this specific error or with any error from the process.
Events with no trigger
Start event
This is the normal start event for a process. It indicates the start of a process instance started by a user (typically in Bonita Applications) or programmatically.
End event
This marks the end of a flow in a process. It is at the end of a process flow. Other flows continue to execute. Typically, end events are only used in advanced cases when several branches need to be completed before the process instance is finished.
If a process has only one end, use a terminate end event instead of an end event.
Terminate end event
This marks the end of all flows in a process. A terminate end event is at the end of a process flow but causes all activity in the process to stop.
It is good practice always to have a terminate end event in a process, because this ensures that a process instance is completely finished when the event is reached.
Throw link and catch link
A link is jump in a process flow. A link has a source, which is a throw link event, and a target, which is a catch link event.
Multiple sources can have the same target. Source and target must be in the same process. Link are used to improve readability of a diagram by breaking up long sequences, to create loops, and to create a "go to" structure.
To configure a link, add the throw link event and catch link event elements to the diagram, then go to the Details panel, General tab, General pane and configure each throw link event to specify the catch link event that is the target. You can check that the link configuration is correct by viewing the configuration of the catch link event, which contains a list of the throw link event with this catch link event as target.
Events and multi-instantiated call activities
Normally, if a called process throws an event (notably an end error event), the parent call activity is notified. However, if the call activity is multi-instantiated, it does not receive the error from the called process. In other words, for a multi-instantiated call activity, the behavior attribute specified in the BPMN standard is set to "all".