Updating Bonita Runtime with Bonita Migration Tool
Guide on how to update Bonita Runtime main version (single or multiple nodes) using Bonita Update Tool.
|
Updating means moving from one Bonita version to a newer one, to benefit from:
|
Overview
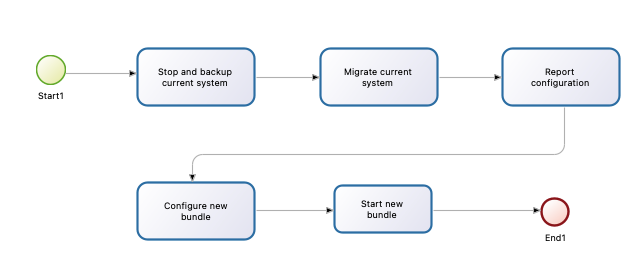
This page explains how to update Bonita Runtime starting from version 7.10.0 till the latest available Bonita Runtime version. Short procedure : Service stopped, update the data, install a new environment, test non-updated elements behavior and compatibility with new bonita version. Detailed version : Updating Bonita bundle: step-by-step procedure.
There are 2 versions of the migration tool:
Tool |
Use cases |
Bonita Migration Tool 1.x |
From version 6.0.2 or later to any version up to 7.0.0 |
Bonita Migration Tool 2.x |
From version 7.0.0 or later to any version up to 7.13.0 |
For example: if you are updating from 6.5.3 to 7.13.0, you must update from 6.5.3 to 7.0.0 using version 1.x of the Bonita Migration Tool, and then update from 7.0.0 to 7.13.0 using version 2.x of the Bonita Migration Tool.
How does Bonita Migration Tool work?
Bonita Migration Tool contains a set of scripts that execute changes on the data for making it compatible with a newer main or maintenance version of Bonita Runtime. The tool is provided as a zip archive that contains an executable script to determine your current version and to request the targeted main Bonita version for the update.
The update process is step-based, with each Bonita main version being equal to a step.
The script manages the sequence of steps from your current version to the targeted main version and supports MySQL, Postgres, Oracle, and Microsoft SQL Server. There is no update for H2 database.
Can Bonita Migration Tool be used to upgrade/downgrade between community and subscription?
The answer is “NO”. The Bonita Migration Tool does not help you upgrade/downgrade between the community/subscription versions, so you cannot change edition at the same time as updating.
Bonita Runtime version to target
Always update to the latest main release by using the Bonita Update Tool. Maintenance releases often contain bug fixes made shortly after the release of subsequent main releases.
For example: the 6.5.4 release may contain fixes to certain bugs that were found in early 7.x.y versions, up to 7.1.0. When you are ready to update from 6.5.4 to a 7.x.y version, make sure you update to at least 7.1.1.
To update from 6.5.4 to 7.13.0, there are two phases: first you update to 7.0.0 then to 7.13.0 version. You are recommended not to start Bonita Runtime 7.0.0 after updating to it, instead, proceed immediately with the second phase of the update process.
Download
Download the target Bonita version bundle and the adequate update tool for your Edition from the Bonitasoft web site for Bonita Community edition or from the Customer Service Center for Bonita Subscription editions. You will also have to download a Tomcat server that matches the target Bonita Runtime version.
Things to know before launching the update
|
Special attention required on:
|
-
Go through the release notes of all the versions till the one targeted for the update, for changes/deprecations/removals and see if they impact your existing developments.
For example: when updating from 7.9.y to 7.11.0, you will need to read all the release notes in between those two versions.
-
Go through the Special cases and Troubleshooting paragraphs below.
-
Secure the update by doing backups. Better safe than sorry.
-
Check that the database version is up-to-date and supported by the new Bonita version.
-
Runtime tomcat server custom configuration: You will need to re-apply your customizations after the update process finishes.
-
Runtime setup folder custom configuration is kept in the database: Custom configurations made and pushed from the setup folder in the previous version are kept in the database. However, to benefit from the changes and improvements made in the product, you may want to compare the files you pull from your database and the target version files available in the setup/platform_conf/initial folder. If your previous version is lower than 7.3, see special cases Updating from a Bonita version lower than 7.3 section below.
-
Deployed process definitions: The processes will continue to run using the definition created in the previous version of Bonita.
-
Custom connectors, actor filers, data types, custom pages, RestAPI extensions: will for sure continue to work in the new version if no custom code has been added, default Bonita code. If you did add custom code, before starting the update, check in the release notes for any breaking changes and test them thoroughly after the update.
-
Business Data Model, and the business database schema: as mentioned above, if the update goes through version 7.0.0, 7.2.0 or 7.2.4, you will need to redeploy your BDM, because 7.0.0 has breaking changes for the BDM. To do so, before starting the update:
-
Log into the Super Administrator application
-
Pause the BPM Services (only if the update goes through version 7.0.0, 7.2.0 or 7.2.4)
-
Redeploy the BDM once the update is done.
-
Resume the BPM Services If the update doesn’t go through version 7.0.0, 7.2.0 or 7.2.4, no action is required for the BDM.
-
-
If you are updating from a version lower than 7.3, see special cases Updating from a Bonita version lower than 7.3 section below.
-
Engine server
-
Engine database (including all data on active and archived process instances)
-
Organization definition
-
Log files from the previous versions will not be touched. A new dedicated folder for the target version will be created to store the log files.
-
Runtime data in Bonita Home (only if you are Updating from a version lower than 7.3)
-
Log files from the previous version are not impacted by update
When the script has finished executing, you will have to complete the update procedure by unzipping and configuring new bundle’s version.
Go through the paragraph Updating Bonita bundle: step-by-step procedure for step-by-step instructions.
Backups
Database files
From database point of view, as any operation on a productive system, an update is not a zero-risk operation. Therefore, it is necessary to backup your database before launching the updating procedure.
Configuration files
As mentioned above, unless you are updating from a version lower than 7.3, Bonita configuration files will not be reseted to the default version in the database.
However, having a backup of your configuration files before launching the updating procedure is HIGHLY recommended, in case you need to merge custom properties and configurations to the target Bonita Runtime. Use the platform setup tool to pull the configuration from the database and save a backup of your setup folder after the pull:
There is below a Linux example:
cd setup
./setup.sh pull
If you are updating from a version lower than 7.3, see special cases Update from a Bonita version lower than 7.3 section below.
Look&Feel
Starting with Bonita 2021.2 (Bonita Runtime 7.13), Bonita Applications replaced Bonita Portal. If you need to use some of the Portal Look&Feel assets in the themes of your applications, make sure you create backups of those files before launching the updating procedure.
There is no guarantee that the Look & Feel definition is compatible across maintenance versions.
For example, in 6.2.2, jquery+ was renamed jqueryplus in BonitaConsole.html, for compatibility with more application servers.
If you are using a custom Look & Feel, export it before updating
Once the update is complete, export the default Look & Feel from the new version,
modify your custom Look & Feel to be compatible with the new definition, and with the recommendations for form footers.
Then import your updated custom Look & Feel into Bonita Portal.
|
Refer to the documentation of the version 2021.1 documentation to know how to export the Look & Feel, get the recommendations for form footers and import the Look & Feel. This documentation is available as a zip archive. |
JRE requirements
Based on your target Bonita version, check whether JRE update is required in your environment before launching the update process:
JRE version |
Bonita version |
JRE version 7 |
If targeting an update from Bonita 7.0 to 7.4.x |
JRE version 8 |
If targeting an update from Bonita 7.5 to Bonita 2021.1 |
JRE version 11 |
If targeting an update from Bonita 2021.2 to 2023.2 |
JRE version 17 |
If targeting an update from Bonita 2024.1 or greater |
For more info, see Support Guide and Supported Environment Matrix for Server.
Database
As mentioned above, the update script supports MySQL, PostgreSQL, Oracle, and Microsoft SQL Server.
-
Check the detailed database requirements to see if updating your database version is required or not.
If an update is required, make sure to apply all the RDBMS customizations required by Bonita when setting up the new database version.
-
If custom indexes have been added to certain tables in the engine database, they should be removed them before launching the update procedure. If not removed, the update procedure will not be completed.
|
RDBMS requirements: The version targeted may not support the version of the database that is being updated. You may then need to upgrade the version of your database prior to running the migration tool.
|
Drivers
Make sure you double-check that you use the official driver version that matches your database version. Having the correct database driver is mandatory for a smooth update.
If you are using an Oracle database, please follow the instructions for Oracle driver download.
Particularly, if you use Oracle 12.2.0.x.y and are updating to Bonita 7.9.n or 7.10.n, then remove the existing ojdbc8-19.3.0.0.jar file, and add the specific JDBC driver to bonita-update/lib. If you use Oracle or Microsoft SQL Server, add the JDBC driver for your database to bonita-update/lib. This is the same driver as you have installed in your web server lib directory. The driver for Oracle 19.3.0.0 is already embedded in bonita-update/lib. If the target version of the update is Bonita 7.9 or greater, you must upgrade to Oracle 12c (12.2.x.y).
Estimated required time
| Bonita Runtime must be shut down during update activities. The time required depends on several factors like your database volume, the gap between the source and the target version and your system configuration, hence it is difficult for Bonita to be precise about the required amount of time. However, the following example can be used as a guide: |
Database entries: |
data: 22541 |
Source version: |
6.0.2 |
Target version: |
6.3.0 |
Time required: |
2.5 minutes |
Updating Bonita bundle: step-by-step procedure
This section explains how to update a platform that uses one of the Bonita bundles.
First, download the target version bundle and Bonita Migration Tool for your edition: * from the Bonitasoft site for Bonita Community edition * from the Customer Service Center for Bonita Subscription Pack editions
Database checks
-
Check that your current RDBMS version is compliant with the versions supported by the targeted version of Bonita (see RDBMS requirements)
-
Unzip the Bonita Migration Tool zip file into a dedicated directory that can be called bonita-update.
-
Configure the database properties needed by the update script, by editing the bonita-update/Config.properties file with the following information:
Property |
Description |
Example |
bonita.home |
The location of the existing bonita_home. Required only until Bonita 7.3 |
|
db.vendor |
Database vendor |
postgres |
db.driverClass |
The driver used to access the database |
org.postgresql.Driver |
db.url |
The url of the Bonita Engine database |
jdbc:postgresql://localhost:5432/bonita-update |
db.user |
The username used to authenticate to the database |
bonita |
db.password |
The password used to authenticate to the database |
bpm |
| If you are using MySQL, add ?allowMultiQueries=true to the URL. For example, db.url=jdbc:mysql://localhost:3306/bonita-update?allowMultiQueries=true. |
Stop Bonita
|
IMPORTANT: Do not pause the BPM services (or activate the maintenance mode) before you stop the application server, unless your Bonita source version is higher than 2021.1, otherwise it will cause problems. |
-
Stop the application server.
-
IMPORTANT: Back up your runtime nodes and databases.
Run Bonita Migration Tool
-
Go to the directory containing the Bonita Migration Tool.
-
Run the appropriate update script:
Version |
Edition |
Script |
Bonita Migration Tool 1.x |
|
|
Bonita Migration Tool 2.x |
Community edition |
|
Bonita Migration Tool 2.x |
Subscription editions |
|
Starting from Bonita Migration Tool 2.44.1, an additional script called check-migration-dryrun is available. It can be used as a pre-update check as it does all the verification without actually migrating the elements. This is equivalent to running the migration script with a --verify option.
|
Migration tool’s execution
The script behind the Migration tool detects the current version of Bonita and displays a list of the versions available for update. Once you specify the version you are targeting, the updating procedure starts.
All along script’s execution you will be informed of the advancement level with user messages, that you will be asked to confirm for proceeding to the next step. The messages contain important information and we strongly advice you to keep a foreground execution. In case you prefer a background execution without user messages, set to “true” ` (-Dauto.accept=true)` system property.
At the end of the update script execution, the new Runtime version, the database update and the time taken for migrating all the elements will be mentioned in a dedicated user message.
After the Migration Tool is completed
|
Reminder The old Tomcat server cannot be used. You will have to install one that matches the target Bonita Runtime version along with the Bonita binaries. |
Setup the target Bonita bundle
-
Unzip the target bundle version into a directory. In the steps below, this directory will be called bonita-target-version.
-
Configure the bundle to use the updated database. Do not recreate the database and use the setup tool of the bonita-target-version. Edit the bonita-target-version/setup/database.properties file to point to the updated database.
-
Download the configuration from database to the local disk using the setup tool of the
bonita-target-version.There is below a Linux example:
cd setup ./setup.sh pull -
If you are updating from a version lower than 7.3, see special cases Update from a Bonita version lower than 7.3 section below.
-
After the setup
pull, you can change your configuration into thebonita-target-version/setup/platform_conf/currentfolder.Please refer to the guide on updating the configuration file using the platform setup tool
-
When done, push the updated configuration into the database:
./setup.sh push
Specific configuration
If you have done specific configuration and customization actions in your server source version, re-do it by configuring the application server at :
target version is older than Bonita 7.3.n |
bonita-target-version/server |
target version is Bonita 7.3.n or greater |
bonita-target-version |
Licenses
Put a new license in the database: see Runtime configuration for further details.
|
Example for Linux cd setup vi database.properties ./setup.sh pull ls -l ./platform_conf/licenses/ |
-
Setup tool Then, install the new license.
|
Code example cp BonitaSubscription-7.n-Jerome-myHosname-20171023-20180122.lic ./platform_conf/licenses/ ./setup.sh push |
Start the new Bonita Runtime
-
Start the application server and clear your browser cache before you start Bonita Applications or you might see old, cached versions of Portal or Applications pages instead of the new versions.
-
Log in to Bonita UIs and verify that the updating procedure has completed.
The Bonita update is now complete.
Updating processes with 6.x forms and case overview pages
Until Bonita 7.0.0, Bonita used UI artifacts based on the Google Web Toolkit (GWT) technology: process instantiation forms, task execution forms and case overview page. The runtime support for those forms and pages was removed in 7.8.0.
It means that if one or more processes on the target server uses 6.x forms or overview page, the migration to a Bonita 7.7.x and greater cannot be performed directly. The following lines explain how to migrate a process to Bonita 7.8.0, for example.
| The disabled processes with 6.x forms cannot be enabled again post update. |
From a Bonita 6.x version |
From a Bonita 7.x version |
|
|
Having 6.x case overview pages on your processes will not prevent updating the platform, however they will all be replaced by the default 7.x case overview page, created with the UI Designer. It means that you might want to redo the case overview page as well as the forms, especially if you have configured a custom case overview page for your processes in version 6.x. Or (for Access, Enterprise, Performance, and Efficiency editions only), you can live update it after update.
|
Note: 6.x application resources have been removed too in 7.8.0, so if you are migrating a process that leverage this feature, you need to modify it (for example to use process dependencies instead (Configure > Process dependencies in Bonita Studio)). |
Updating from a Bonita version lower than 7.3
Starting from version 7.3 there is no more bonita home folder. This means that, you will need to manually re-do all the configuration and customization that used to be stored in your bonita home folder and in your server original version.
When updating from a version lower than 7.3, after the you run the migration tool, the default configuration files of the new version will be pushed in the database.
Therefore, if your installation didn’t have any custom changes in the bonita home folder, then you do not need to configure the bundle any further for an installation migrated in 7.3+ or greater.
On the other hand, if you had customized your configuration in the bonita home folder, you will have to use the platform setup tool to update the default configuration and apply yours to push it in the database where configuration is now stored.
Here’s how to reapply configuration made to the platform, using the setup tool of the bonita-target-version:
-
Download the configuration from database to the local disk using the setup tool of the
bonita-target-version.There is below a Linux example:
cd setup ./setup.sh pull -
You must then reapply the configuration that had been done on the original bonita home folder into the
bonita-target-version/setup/platform_conf/current. Please refer to the guide on updating the configuration file using the platform setup tool
Some manual operation have to be done on files that are located in the bonita home folder if version <7.3.0 or in the extracted setup/platform_conf/current folder in target version >=7.3.0. You will need to check and merge the previous file version and the migrated one: . In the case where deployed resources have required dedicated authorizations to use the REST API, these authorizations are not automatically migrated.
conf/compound-permissions-mapping.properties : contains list of permissions used for each resources
conf/resources-permissions-mapping.properties : contains permissions for REST API extensions
conf/custom-permissions-mapping.properties : contains custom permissions for users and profiles
conf/dynamic-permissions-checks.properties : used if dynamic check on permissions is enabled
-
You will have to reapply this configuration in the same files in
/setup/platform_conf/current/tenant_portal/folder. -
When done, push the updated configuration into the database:
./setup.sh push -
If you have done specific configuration and customization in your server original version, re-do it by configuring the application server in bonita-target-version folder if target version is 7.3.n: customization, libs, transaction default timeout, etc.
Update case overview pages before updating to 7.8.0
All case overview pages, as well as the forms from a 6.x version will be replaced the default 7.x case overview page, created with the UI Designer. This means that you might want to redo the case overview pages as well as the forms, especially if you have configured a custom case overview page for your processes in version 6.x.
|
Access, Enterprise, Performance, and Efficiency editions only Alternatively, you can also live update the case overview page once the update is complete. |
Starting with Bonita 7.8, Bonita Migration Tool has the option to allow you replace 6.x case overview pages with the default 7.x case overview page (created with the UI Designer). This way you get to see if the page suits your needs. If not, it can be used as a base to customize your case overview page.
Your pages will then be ready for the update to Bonita Runtime 7.8.0 version.
To run this option, unzip the migration tool and execute the following commands. If you want to update several processes, you will have to run the command for each processDefinitionId’s.
Example:
./bonita-migration-distrib-sp --updateCaseOverview 6437638294854549375Community edition |
Subscription edition |
|
Linux |
./bonita-migration-distrib --updateCaseOverview <PROCESS_DEFINITION_ID> |
./bonita-migration-distrib-sp --updateCaseOverview <PROCESS_DEFINITION_ID> |
Windows |
./bonita-migration-distrib.bat --updateCaseOverview <PROCESS_DEFINITION_ID> |
./bonita-migration-distrib-sp.bat --updateCaseOverview <PROCESS_DEFINITION_ID> |
Example:
./bonita-migration-distrib-sp --updateCaseOverview 6437638294854549375|
This tool will only change case overview pages. This means that if some of your processes still have process instantiation / task execution forms, you need to redesign them in the Studio using Bonita UI designer, as explained in the section above. |
Example of output issued when running the tool:
6.x Application resources
6.x application resources have been removed in Bonita 7.8.0, so if you are migrating a process that leverages this feature, you need to modify it (for example to use process dependencies instead (Configure > Process dependencies in Bonita Studio)).
Updating to Java 11 in Bonita 7.9 or a greater version
Bonita 7.9 and greater versions support Java 11.
|
Updating an existing platform to Java 11 is neither easy nor a painless endeavour. It’s just has to be done. |
-
Update Bonita Runtime to Bonita 7.9.0 as usual, and keep running it in Java 8
-
Verify that everything works as expected
-
Test the target Runtime in Java 11, on a test environment
-
Update what is required on the production server
-
Switch it to Java 11
The main parts that require attention and testing are connectors and custom code.
Also, custom connectors, groovy scripts, REST API extensions etc. are not migrated and might not work as expected in Java 11, namely WebService, CMIS, Email and Twitter. For those, see connector details regarding migration to 7.9.
Special attention has to be given to custom code dependencies, as they might: * either not work in Java 11, * work fine but be in conflict with Bonita dependencies * the script might use dependencies previously included in Bonita, but accessible in a different version.
ERROR: Thorough testing has to be carried out to ensure there is no regression when migrating Bonita to version 7.9 and greater.
Updating to Bonita 7.9 or a greater version using PostgreSQL
Bonita 7.9 and greater versions support PostgreSQL 11.x (x>=2) which is NOT compatible with previous versions.
-
Shutdown Bonita
-
Run the migration tool to the latest Bonita version supporting postgreSQL 9 (7.8.4)
-
Backup the database
-
Update PostgreSQL from 9 to 11.x (x>=2) following the Official documentation
-
Run the migration tool again to the target Bonita version requiring PostgreSQL 11
-
Restart the new Bonita Runtime
Updating to Bonita 7.9 or a greater version using MySQL
Bonita 7.9 and greater versions support MySQL 8.0.x version, which is NOT compatible with older versions of MySQL. .For this reason, to update to Bonita 7.9 or a greater version when using MySQL, follow this procedure: * Make sure Bonita Runtime is shut down * Run the migration tool to update to Bonita 7.9 or greater, following the procedure above * Update your MySQL database server installation following the official documentation * Restart the new Bonita Runtime
Updating to Bonita 7.9 or a greater version using Oracle
Bonita 7.9 and greater versions support Oracle 12c (12.2.0.x.y) and Oracle 19c (19.3.0.0) versions: this is a mandatory change. The Oracle database server change HAS to be done before updating from Bonita 7.8.4 to Bonita 7.9.0.
If the target version is Bonita 7.8.4 follow the steps below, else Update Oracle database server. * Shut down Bonita Runtime. * Run the migration tool to update to Bonita 7.8.4, following the updating procedure. * Update your Oracle database server to the version 12c (it must be 12.2.x.y) * Run the migration tool again to update Bonita to 7.9 or a greater version * Restart the new Bonita Runtime
Updating to 7.8.4
If the target version is Bonita 7.8.4 with Oracle Database, skip this section and jump directly to Update Oracle database server section. * Shut down Bonita Runtime * Run the Bonita Migration tool to update to Bonita 7.8.4, following the updating procedure.
Update Oracle database server
-
Shut down Bonita Runtime
-
Update the Oracle database server to the version 12c (it must be 12.2.0.x.y) or 19c (it must be 19.3.0.0)
Configure the Oracle database server
-
Configure the Oracle database server, in particular activate the XA transactions management: see the Oracle Database section in the Database creation and configuration for Bonita engine and BDM page.
-
Install the missing Oracle components
-
Execute the SQL scripts to install XA management elements
-
Execute the SQL requests to GRANT the proper rights to the Oracle users; for both Bonita and BDM schemas
Download the specific jdbc driver for the Oracle 12c (12.2.0.x.y) or 19c (19.3.0.0)
Caution: two different jdbc driver jar files may share the same name (ojdbc8.jar).
Each file however is specific to the Oracle DB server version installed. Please make sure to download the appropriate one: * Oracle 12c (12.2.0.x.y) : Driver ojdbc8.jar Oracle Database 12.2.0.1 JDBC Driver & UCP Downloads ( make sure it is the official driver by checking the SHA1 Checksum: 60f439fd01536508df32658d0a416c49ac6f07fb ) * Oracle 19c (19.3.0.0) : Driver ojdbc8.jar Oracle Database 19c (19.3) JDBC Driver & UCP Downloads ( make sure it is the official driver by checking the SHA1 Checksum: 967c0b1a2d5b1435324de34a9b8018d294f8f47b )
Note: Bonita Migration Tool includes the Oracle driver for Oracle 19c (19.3.0.0) in the bonita-migration/lib directory. If your are not using Oracle 19c (19.3.0.0) you need to replace it.
Check the Bonita 7.8.4 server starts with the Oracle database server 12c (12.2.0.x.y) or 19c (19.3.0.0)
-
Download and install a Bonita 7.8.4 bundle
-
Setup the Bonita 7.8.4 bundle to use the Oracle 12c (12.2.0.x.y) or 19c (19.3.0.0) database
-
Request and install a temporary 7.8 license in the Bonita bundle
-
Start the Bonita 7.8.4 bundle
-
Check that you can successfully log into the Bonita Portal.
Updating to Bonita 7.11 or a greater version using Oracle
Bonita 7.11 and greater versions support Oracle 19c version.
-
Shut down Bonita Runtime
-
Run the migration tool to update to Bonita 7.10.5, following the procedure above
-
Update your Oracle database server to version 19c (version 7.10.x is compatible with 12c and 19c.)
-
Run the migration tool again to update to Bonita 7.11.0 or greater version
-
Restart the new Bonita Runtime
|
When updating the Oracle database make sure that the initialization parameter Compatible is not set to a previous version. You can check this with the query: SQL> SELECT name, value FROM v$parameter WHERE name = 'compatible'; |
Updating to Bonita 7.11 or a greater version using SQL Server
Bonita 7.11+ supports SQL Server 2017 version.
-
ensure your Bonita platform is shut down
-
run Bonita Update tool to update Bonita platform to version 7.11.0 or newer, following the above procedure
-
then upgrade your SQL Server database server to version 2017
-
restart your updated Bonita platform
Updating maintenance versions starting with Bonita 7.11
-
Download the new bundle version from Bonitasoft site for Bonita Community edition or from the Customer Service Center for Bonita Subscription editions
-
Shut down your old Bonita Runtime
-
Unzip and configure the new bundle This means copying the configuration files of the old Bonita Runtime, mainly database.properties, server.xml, internal.properties if changes have been made.
-
Start the new bundle
-
Delete the old bundle files
Updating a Bonita Runtime cluster
A Bonita Runtime cluster must have the same binary version of Bonita and database version on all nodes. To update a Bonita Runtime cluster, download the right Bonita dedicated tool:
From Bonita version |
Till Bonita version |
Tool version |
6.x.y |
7.0.0 |
Bonita Migration Tool 1.X A dedicated tool is available for Performance cluster, default Performance migration tool does not support cluster update. |
7.0.0 |
7.13.y |
Bonita Migration Tool 2.X Cluster update included. |
7.10.y |
latest main version |
Bonita Update Tool 3.X Cluster update included. |
|
In a cluster environment, you need to STOP ALL your nodes and update them before starting them with the new maintenance version. On one node, follow the procedure above to update Bonita Runtime. When the update is complete on one node, follow steps 12 and 16 on all the other nodes. The update of the cluster is then complete, and the cluster can be restarted. |
Migrate your client applications
If you have applications that have Bonita as client, you will have to change your client code or library. For backward compatibility checks, refer to the release notes.
In addition, if your application connects to Bonita Engine using the HTTP access mode, see the xref:ROOT:configure-client-of-bonita-bpm-engine.adoc[bonita-client library] documentation page.
Troubleshooting
Timers are stuck after updating to Bonita 7.10.0 or greater versions
Symptom: When updating to Bonita 7.10.0 or a greater version, the timers on processes do not work anymore. Cause: A bug in the pause/resume mechanism of tenant services, fixed in Bonita 7.12.1. This issue happens because the BPM services were paused before the update was performed. Solution: If the BPM services were paused before the update or had to be paused for whatever reason, then to resolve this, you need to execute the following database requests after the update completes, and before you restart your Bonita Runtime:
DELETE FROM QRTZ_PAUSED_TRIGGER_GRPS;
UPDATE QRTZ_TRIGGERS SET TRIGGER_STATE = 'WAITING' WHERE TRIGGER_STATE = 'PAUSED';
After this operation, the table QRTZ_PAUSED_TRIGGER_GRPS should be empty, and all the triggers in the QRTZ_TRIGGERS table should be in state waiting, and not paused.
Some foreign keys are duplicated
|
This issue is fixed in Bonita 7.11.6, without any action required from the platform administrator. |
Symptom: After updating to a Bonita version comprised between 7.11.0 and 7.11.5, after re-installing/updating the BDM, some foreign key constraints are effectively duplicated: there are foreign keys that refer to the same columns and tables, but with a different name. Cause: A bug was introduced in Bonita 7.11.0 by upgrading an external library, Hibernate, from version 4 to 5. This new version introduces a known bug.
Solution: Doing nothing is an option, as there is no change in product behaviour. If you wish to clean your BDM database, follow the procedure below:
-
Stop your bonita server
-
Open the database in an edition tool or execute in command line the relevant commands.
Select all the foreign keys on a table of your BDM objects:
MySQL |
SELECT TABLE_NAME,COLUMN_NAME,CONSTRAINT_NAME, REFERENCED_TABLE_NAME,REFERENCED_COLUMN_NAME FROM INFORMATION_SCHEMA.KEY_COLUMN_USAGE WHERE REFERENCED_TABLE_SCHEMA = '<your_business_data_db_name>' AND REFERENCED_TABLE_NAME = '<your_table_name>'; |
MS SQL Server |
select name [foreign key constraint name], OBJECT_NAME(parent_object_id) [created table], OBJECT_NAME(referenced_object_id) [referenced table] from sys.foreign_keys where parent_object_id = OBJECT_ID('<your_table_name>') OR referenced_object_id = OBJECT_ID('<your_table_name>') |
PostgreSQL |
SELECT conname, pg_catalog.pg_get_constraintdef(r.oid, true) as condef FROM pg_catalog.pg_constraint r WHERE r.conrelid = '<your_table_name>'::regclass AND r.contype = 'f' ORDER BY 1 |
-
These requests will give you all the foreign keys on a table. Among these, search for duplicated ones: the duplicated foreign keys should have the following names: FK_<hash> & FK<another_hash>. The two different names should be for keys referencing the same columns on the same table. Delete the one named: FK_<hash>.
-
Repeat for all the tables of your BDM database.
-
Start your Bonita Runtime
|
Guidance is not provided for Oracle, as the situation is impossible. Oracle prevents the creation of 2 identical foreign keys with different names. Instead, the BDM redeployment will fail after migration. Updating to Bonita 7.11.6 or greater versions fixes the issue. |
Addendum
Connector details regarding migration to 7.9
For Bonita 7.9.0, the migration step tries to migrate the CMIS, Email and Webservice connectors of the processes deployed on the platform, along with their dependencies, to allow the migrated platform to run on Java 11.
The step works at best effort:
-
It will try to upgrade all the connectors it can.
-
It will not upgrade connectors that have dependencies used by other connectors. Those connectors will still work on java 8, but not in java 11, and will require a manual update.
-
A detailed report of all the changes made is displayed at the end of the migration step.
-
Beware that if one of these connectors' removed dependencies was used in one your scripts, it will still be removed/updated, and therefore your scripts might not work anymore after migration. The full list of updated and deleted dependencies can be found below.
From Bonita 7.9+, the supported version of Oracle database is 12c (12.2.x.y) To migrate to Bonita 7.9+ from an earlier version than Oracle 12c (12.2.x.y), see Migrating to Bonita 7.9+ using Oracle.
WebService connector
The following dependencies have been added, to ensure Java 11 compliance:
-
javax.xml.stream:stax-api:1.0-2
-
org.codehaus.woodstox:woodstox-core-asl:4.1.2
-
org.codehaus.woodstox:stax2-api:3.1.1
-
com.sun.istack:istack-commons-runtime:2.4
-
javax.activation:activation:1.1
-
com.sun.xml.messaging.saaj:saaj-impl:1.3.28
-
javax.xml.ws:jaxws-api:2.2.7
-
com.sun.xml.ws:jaxws-rt:2.2.7
-
javax.jws:jsr181-api:1.0-MR1
-
javax.xml.bind:jaxb-api
-
com.sun.xml.bind:jaxb-impl
CMIS connector
The following dependencies were updated to ensure Java 11 compliance:
-
org.apache.chemistry.opencmis:chemistry-opencmis-client-impl dependency has been updated from 0.13.0 to 1.1.0
-
org.apache.chemistry.opencmis:chemistry-opencmis-client-api dependency has been updated from 0.13.0 to 1.1.0
-
org.apache.chemistry.opencmis:chemistry-opencmis-commons-api dependency has been updated from 0.11.0 to 1.1.0
-
org.apache.chemistry.opencmis:chemistry-opencmis-commons-impl dependency has been updated from 0.11.0 to 1.1.0
-
org.apache.chemistry.opencmis:chemistry-opencmis-client-bindings dependency has been updated from 0.11.0 to 1.1.0
-
org.apache.cxf:cxf-rt-bindings-xml dependency has been updated from 2.7.7 to 3.0.12
-
org.apache.cxf:cxf-rt-frontend-simple dependency has been updated from 2.7.7 to 3.0.12
-
org.apache.cxf:cxf-rt-core dependency dependency has been updated from 2.7.7 to 3.0.12
-
org.apache.cxf:cxf-rt-transports-http dependency has been updated from 2.7.7 to 3.0.12
-
org.apache.cxf:cxf-rt-ws-policy dependency has been updated from 2.7.7 to 3.0.12
-
org.apache.cxf:cxf-rt-ws-addr dependency has been updated from 2.7.7 to 3.0.12
-
org.apache.cxf:cxf-rt-bindings-soap dependency has been updated from 2.7.7 to 3.0.12
-
org.apache.cxf:cxf-rt-databinding-jaxb dependency has been updated from 2.7.7 to 3.0.12
-
org.apache.cxf:cxf-rt-frontend-jaxws dependency has been updated from 2.7.7 to 3.0.12
-
org.apache.neethi:neethi dependency has been updated from 3.0.2 to 3.0.3
-
org.apache.ws.xmlschema:xmlschema-core dependency has been updated from 2.0.3 to 2.2.1
The following dependencies have been added to ensure Java 11 compliance:
-
org.apache.cxf:cxf-rt-wsdl-3.0.12
The following dependencies have been removed:
-
org.jvnet.mimepull:mimepull-1.9.4.jar
-
org.codehaus.woodstox:stax2-api-3.1.1.jar
-
org.apache.geronimo.javamail:geronimo-javamail_1.4_spec-1.7.1.jar
-
org.codehaus.woodstox:woodstox-core-asl-4.2.0.jar
-
org.apache.cxf:cxf-api-2.7.7.jar
In addition bonita-connector-cmis-<version>.jar and bonita-connector-cmis-common-<version>.jar have been replaced by a single bonita-connector-cmis-<version>.jar