Sharepoint integration example
|
Bonita now provides a native SharePoint connector with built-in authentication, automatic retry, and resumable upload support. For new projects, we recommend using the SharePoint connector instead of the manual REST approach described below. |
This article will help you explore one of the possible ways to integrate your Bonita applications with Microsoft 365 - using Graph API. Microsoft Graph is a single endpoint, providing access to data and services in the Microsoft cloud. It exposes REST APIs to access data on Microsoft 365 services like OneDrive, Outlook, Sharepoint, Team etc. Using it, you can imagine different kinds of applications that let you handle your meetings based on process tasks, generate excel files in your OneDrive with the data handled by your processes, …
In this example, we focus on the Sharepoint integration and we will highlight only the main steps. For all other scenarios and details, you can visit Graph documentation. Note: you can get an instant sandbox preconfigured with sample data if you join Microsoft 365 Developer Program (free renewable 90-day subscription), including Sharepoint.
Authentication and authorization
In order to call Microsoft Graph, your application should first generate an access token from the Microsoft identity platform. Access tokens will contain information allowing to validate the caller and to ensure that the caller has proper permissions to perform the operation requested. There are different types of permissions: application and delegated and you should choose the most suitable approach for your needs. In our example, we use the application permission, as we don’t need to act on behalf of a specific user.
Before you can request a token, your application must be registered in the Azure portal.
Go to Entra ID (formerly Azure Active Directory) and choose App registrations. Create a New registration, provide a new name for your application and select the account type.
For your newly registered application, you then need to expose an API (add a scope and authorized client application using its Client ID).
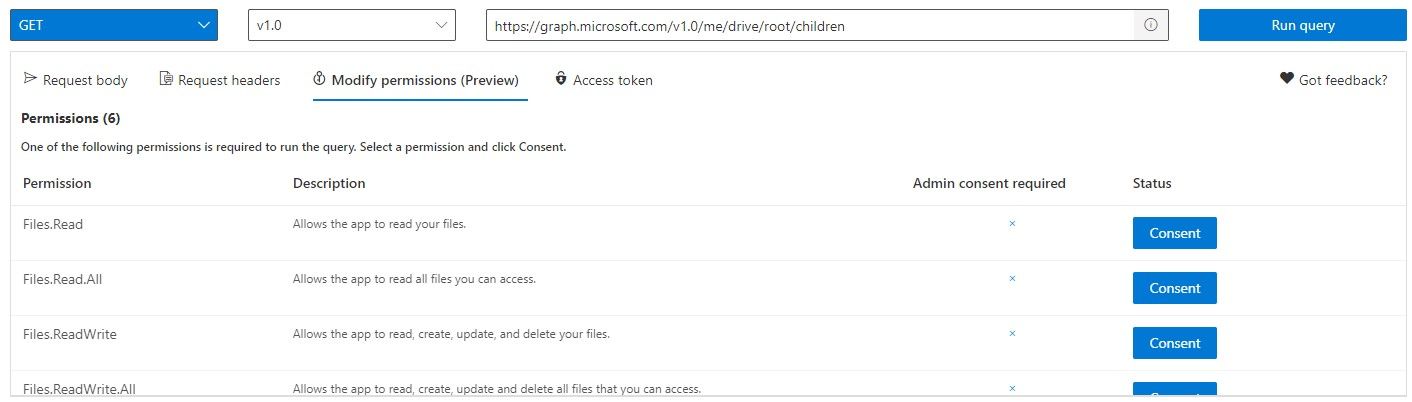
Finally, you need to add API permissions. It is a good practice to add only the permissions that you need in order to limit the security risks, and decide whether only Read permissions would be enough for certain objects or if you need to give ReadWrite access. You can use the online Graph Explorer to help you determine which permissions you need to add. You can execute sample queries and it will show you the list of permissions used.
REST API connector configuration
Generate token
You can use the POST connector and generate a token that you can then use for other actions. The URL to call is:
https://login.microsoftonline.com/' + sharepointTenant +'/oauth2/v2.0/tokenwhere sharepointTenant should contain your tenant name (such as abcdef.microsoft.com).
You need to use application/x-www-form-urlencoded as the Content Type, and your Payload could be as follows:
'grant_type=client_credentials&client_id='+ azureClientID + '&client_secret='+ azureClientSecret +'&scope=https://graph.microsoft.com/.default'where grant_type must contain “client_credentials”, client_id should contain the Application ID that you got while registering your application in Azure Portal, and client_secret should contain the secret that you generated for your app. You can use the scope value from this example if you want to access all the application permissions that you have configured for your application in the portal. You can parse the bodyAsString output of your connector in order to get the token and store it in a process variable or a parameter:
import groovy.json.JsonSlurper
def slurper = new JsonSlurper()
def object = slurper.parseText(bodyAsString)
return object.access_token
Create folder
As described in the Graph documentation, there are different POST calls that you can make, depending on your use case. In this example, we want to create a new folder, using a call to:
/drives/{drive-id}/items/{parent-item-id}/childrenYou should use application/json as a Content Type, and here is an example of a payload using Groovy script:
return '{"name": "'+ request.caseId.toString() +'", "folder": { }, "@microsoft.graph.conflictBehavior": "rename"}'You need to add a header with a key “Authorization” and the value of the token that you previously generated (see above). It is helpful to save the name of the newly created folder so you can use it later on to upload documents to it.
Upload small files
If you want to upload files smaller than 4MB, you can use a PUT File connector with a url in this format:
/drives/{drive-id}/items/{parent-id}:/{filename}:/contentwith application/octet-stream as a Content Type and selecting a process document from the drop-down list. Don’t forget the Authorization header.
For large files, you should use a resumable upload with a session. Find more information in the Graph REST documentation here.