OpenID Connect SSO configuration
Bonita can be configured to use the OpenID Connect (OIDC) protocol to provide Single Sign-On (SSO), as long as you already have an OpenID Connect Identity Provider server up and running (IdP). OIDC is an extension of OAuth 2.0.
Contrary to the SSO support of SAML2, both Bonita Web User Interface and Bonita REST API can be secured and accessed using the OIDC/OAuth protocols (versus just the Web User Interface for SAML2)
|
For Teamwork, Efficiency, Performance, Enterprise and Scale editions only. |
This information applies to a Bonita platform deployed from a bundle, not to the Engine launched from Bonita Studio. <BUNDLE_HOME> refers to the root directory of the bundle.
|
Bonita uses Keycloak OIDC Service client adapter. It has been extended to support other OIDC providers than Keycloak. |
OpenID Connect overview for Bonita
Only the Authorization Code Flow of OpenID Connect (with or without refresh token) is supported. Not the Implicit Flow.
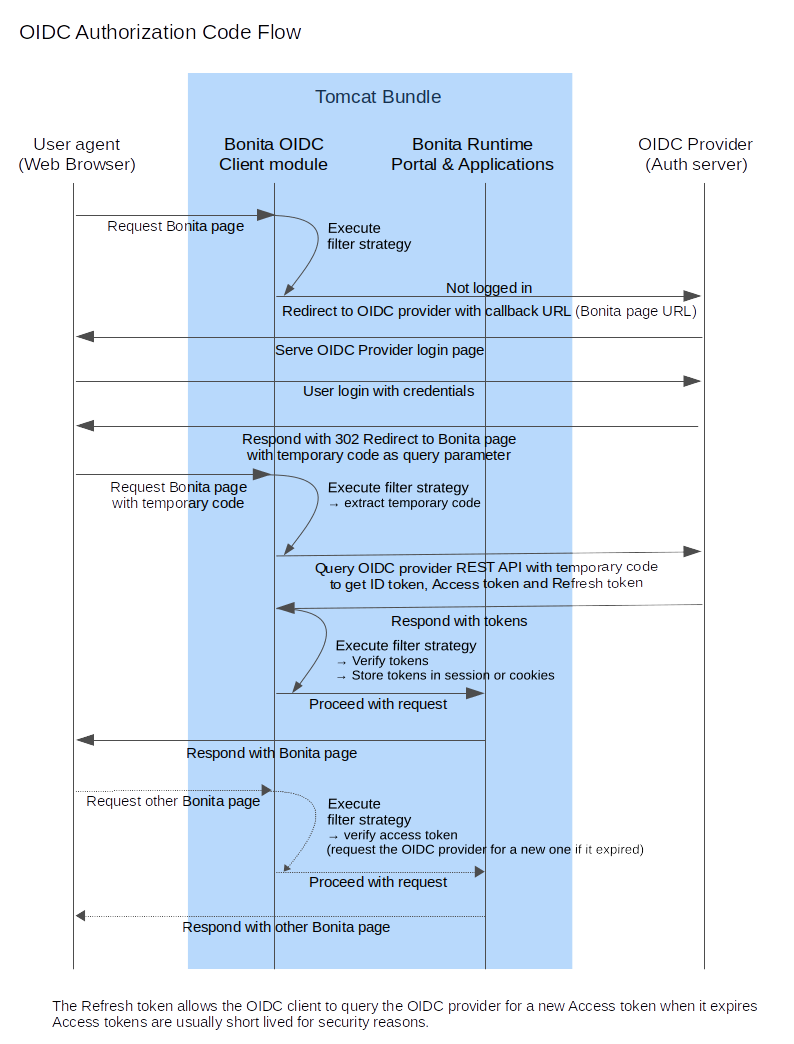
This is an overview that describes the steps of the authentication process on a Bonita bundle configured as an OIDC client:
Here are some details about the Bonita OIDC module, it is composed of:
-
A servlet filter that intercepts all the requests to Bonita Application pages
It checks if the user is already logged in on Bonita
-
If already logged in => Allow the access
-
If not logged in => Redirect to IdP (with scope, client Id, redirect URI, and
coderesponse type)
-
-
An Implementation of the Authentication Manager extension point that retrieves the authentication information in the requests to log in to Bonita engine with the right credentials.
|
The |
Configure Bonita Bundle for OIDC
You need to execute the following actions in the folder for which you want to support authentication over OpenID Connect.
The bundle already contains the files needed to use OIDC with Bonita platform. To configure Bonita for OIDC:
-
If you do not already have one:
-
Download a Subscription edition bundle from the Customer Service Center
-
Configure it as needed
-
Run it a first time, so that the Bonita platform is created
-
Stop it and run
setup[.sh][.bat] pullto retrieve current configuration before modifying the configuration files below
-
-
In the tenant_portal folder of each existing tenant:
<BUNDLE_HOME>/setup/platform_conf/current/tenant_portal, edit theauthenticationManager-config.propertiesas follows:--> #auth.AuthenticationManager = org.bonitasoft.console.common.server.auth.impl.standard.StandardAuthenticationManagerImpl (...) --> auth.AuthenticationManager = org.bonitasoft.console.common.server.auth.impl.oidc.OIDCAuthenticationManagerImpl --> oidc.filter.active = true --> oidc.auth.standard.allowed = true --> oidc.logout.url = http://localhost:9090/auth/realms/bonita/protocol/openid-connect/logout --> oidc.logout.url.redirectQuery = ?post_logout_redirect_uri={encodedRedirectUri}&id_token_hint={idToken} --> auth.tenant.admin.username = install --> auth.passphrase = BonitaBPM (...) --> auth.tenant.standard.whitelist = william.jobs (...) --> logout.link.hidden=trueMake sure to set the right admin username (property
auth.tenant.admin.username). It is recommended to also replace the value of the passphrase (propertyauth.passphrase) which is used by the engine to verify the authentication request. The value must be the same as in the file bonita-tenant-sp-custom.properties.
If you need users to be able to log in without having an account on the IDP, you can authorize it by setting the propertyoidc.auth.standard.allowedto true. Users will then be able to log in using the Bonita login page (/login.jsp) provided they have a Bonita account and their password is different from their username.
If only a limited group of users need to bypass OIDC authentication method you can restrain it by setting the propertyoidc.auth.standard.allowedto false and setting the propertyauth.tenant.standard.whitelistwith the list of authorized usernames (comma separated). Otherwise you can keep it commented.
Only if you want Bonita logout to perform OpenID logout you can uncomment and configure the propertiesoidc.logout.urlandoidc.logout.url.redirectQuery. See the Configure logout behavior section for more details about logout. -
In the tenant_engine folder of the existing tenant:
<BUNDLE_HOME>/setup/platform_conf/current/tenant_engine/edit the file bonita-tenant-sp-custom.properties as follows:# Authentication service to use. Some are natively provided: # authenticationService # * binded to bonita authentication mode # * impl: org.bonitasoft.engine.authentication.impl.AuthenticationServiceImpl # jaasAuthenticationService # * to use JAAS # * impl: com.bonitasoft.engine.authentication.impl.JAASGenericAuthenticationServiceImpl # * this is the one to configure SSO over CAS (CAS properties to be defined hereafter # noAuthenticationService # * does no authentication on the engine side # * impl: com.bonitasoft.engine.authentication.impl.NoAuthenticationServiceImpl # passphraseOrPasswordAuthenticationService # * Used by SSO implementations, login only if a passphrase is valid, or if a username/password is valid. # * Requires PassphraseOrPasswordAuthenticationService bean to be uncommented in bonita-tenant-sp-custom.xml # * impl: com.bonitasoft.engine.authentication.impl.PassphraseOrPasswordAuthenticationService # you can provide your own implementation in bonita-tenant-sp-custom.xml and refer to the bean name of your choice --> authentication.service.ref.name=passphraseOrPasswordAuthenticationService # If authentication.service.ref.name equals "passphraseOrPasswordAuthenticationService", # you need to configure the following passphrase --> authentication.service.ref.passphrase=BonitaBPM # Create users on the fly, when they are missing from bonita but authenticated by the SSO. The user will belong to the group and role specified below. #authentication.passphraseOrPasswordAuthenticationService.createMissingUser.enable=true #bonita.runtime.authentication.passphrase-or-password.create-missing-user.addDefaultMembership.enable=true #authentication.passphraseOrPasswordAuthenticationService.createMissingUser.defaultMembershipGroupPath=/acme/hr #authentication.passphraseOrPasswordAuthenticationService.createMissingUser.defaultMembershipRoleName=member #bonita.runtime.authentication.passphrase-or-password.create-missing-user.createDefaultGroupAndRole.enabled=true #bonita.runtime.authentication.passphrase-or-password.create-missing-user.createUserGroupsAndRole.enabled=true #bonita.runtime.authentication.passphrase-or-password.create-missing-user.lowerGroupsAndRoleNamesCase.enabled=true # CAS authentication delegate : enables the user, providing login/password, # to be logged in automatically against CAS web application # To be used in conjunction with the generic authentication service configured with CAS (jaasAuthenticationService) #authenticator.delegate=casAuthenticatorDelegate #authentication.delegate.cas.server.url.prefix=http://ip_address:port #authentication.delegate.cas.service.url=http://ip_address:port/bonita/loginserviceIt is recommended to also replace the value of the passphrase (property auth.passphrase). The value must be the same as in the file authenticationManager-config.properties updated previously.
When accounts creation on the fly is required for all users accessing Bonita that have been authenticated with the IdP, uncomment the property
authentication.passphraseOrPasswordAuthenticationService.createMissingUser.enable, as well as subsequent properties and set the value to true. For more information see User account provisioning with single sign-on (SSO).Activating this option means any user authorized by the IdP to access Bonita will have an account created automatically in Bonita Database. -
In the tenant_portal folder of the existing tenant:
<BUNDLE_HOME>/setup/platform_conf/current/tenant_portal,
edit the file keycloak-oidc.json to setup Bonita webapp as an OIDC client working with your OIDC provider.{ "realm": "master", "resource": "bonita", "auth-server-url": "http://localhost:9090/auth", "auth-url": "{auth-server-url}/realms/{realm-name}/protocol/openid-connect/auth", "token-url": "{auth-server-url}/realms/{realm-name}/protocol/openid-connect/token", "logout-url": "{auth-server-url}/realms/{realm-name}/protocol/openid-connect/logout", "token-issuer-uri": "{auth-server-url}/realms/{realm-name}", "user-info-url": "{auth-server-url}/realms/{realm-name}/protocol/openid-connect/userinfo", "jwks-url": "{auth-server-url}/realms/{realm-name}/protocol/openid-connect/certs", "jwt-access-token": true, "scope-values": "openid profile email", "save-target-url-in-state": true, "ssl-required": "external", "principal-attribute": "preferred_username", "public-client": false, "autodetect-bearer-only": true, "enable-cors": true, "cors-allowed-methods": "POST, PUT, DELETE, GET", "credentials" : { "secret" : "put-your-secret-here" } }-
The property
realmis only required if you use a Keycloak server as OIDC provider or if you want to benefit from the templating in the*-urlproperties ({realm-name} will be replaced with the realm value). If you use a Keycloak server, make sure you set it with the name of the realm in which your Bonita OIDC client is/will be created. -
resourceis the OIDC client Id given to your Bonita installation. You can change it if you want but you need to provide it to your OIDC provider. -
auth-server-urlis the base URL of the OIDC provider server. All other service endpoints URL values can reuse this base URL with the placeholder{auth-server-url}. -
auth-urlneeds to be set with the URL of your OIDC provider Authorization endpoint. It can be prefixed with{auth-server-url}to only indicate the path of the end point or be a full absolute URL. This property is specific to Bonita OIDC module and is not supported/documented by Keycloak. -
token-urlneeds to be set with the URL of your OIDC provider Token endpoint. It can be prefixed with{auth-server-url}to only indicate the path of the end point or be a full absolute URL. This property is specific to Bonita OIDC module and is not supported/documented by Keycloak. -
logout-urlneeds to be set with the URL of your OIDC provider Logout endpoint. It can be prefixed with{auth-server-url}to only indicate the path of the end point or be a full absolute URL. This property is specific to Bonita OIDC module and is not supported/documented by Keycloak. -
token-issuer-urineeds to be set with the URL that will be used as issuer in the JWT tokens (issclaim). It can be prefixed with{auth-server-url}to only indicate the path of the issuer URI or be a full absolute URI. For example using Google’s OIDC provider, the issuer ishttps://accounts.google.com. This property is specific to Bonita OIDC module and is not supported/documented by Keycloak. -
user-info-urlneeds to be set with the URL of your OIDC provider userInfo end point. It is only used when accessing a resource with a BearerAuthorizationheader with an access token that is opaque (not a JWT) and cannot be validated or used to retrieve the logged in user claims. It can be prefixed with{auth-server-url}to only indicate the path of the end point or be a full absolute URL. This property is specific to Bonita OIDC module and is not supported/documented by Keycloak. -
jwks-urlneeds to be set with the URL of your OIDC provider JSON Web Key Set endpoint. It can be prefixed with{auth-server-url}to only indicate the path of the end point or be a full absolute URL. For example with Google as OIDC provider, this URL ishttps://www.googleapis.com/oauth2/v3/certs. This property is specific to Bonita OIDC module and is not supported/documented by Keycloak. -
jwt-access-tokenindicates if the access token is a JWT and should be validated. If false, it will be considered by Bonita OIDC module as an opaque token, its validation won’t be performed (but the ID token will, however, be validated) and the retrieval of the logged in user principal name will be delegated to the userInfo endpoint (seeuser-info-url) when accessing a resource with a BearerAuthorizationheader. Even if the access token is a JWT, this property should be set to false when the OIDC clients are not supposed/able to validate it. This property is specific to Bonita OIDC module and is not supported/documented by Keycloak. -
scope-valuescan be used to set the value of thescopeparameter sent to the OIDC provider in the authentication request. The scope valueopenidis automatically added if it is no present, but you can add other scope values likeemailorprofiledepending on your OIDC provider configuration and the claims you need in the JWTs to match Bonita username. This property is specific to Bonita OIDC module and is not supported/documented by Keycloak. -
Some OpenID Connect providers do not support having a pattern of valid redirecting URIs. It is the case with Google’s for example. With those providers you can use the
stateparameter to pass the target URL (the URL you initially requested and want to be redirected to). In order to do that, set the propertysave-target-url-in-statetotrue. When you do that, the redirect_URI query parameter will always be the same. Its default value is the path/bonita/keycloakon Bonita server, but you can set a different value using the propertyredirect-uri-path. Make sure this URL is part of the valid redirect URIs in you OIDC provider configuration for the Bonita client. Whensave-target-url-in-stateis set tofalseor not present, theredirect_URIquery parameter is used to save the target URL. Those properties are specific to Bonita OIDC module and are not supported/documented by Keycloak. -
the
ssl-requiredproperty value may need to be changed if Bonita Runtime and the IdP are not both accessed via HTTPS. Possible values for this property are:all,external, andnone. Forall, all requests must come in via HTTPS. Forexternal, only non-private IP addresses must come over via HTTPS. Fornone, no requests are required to come over via HTTPS (not recommended for production). For instance, using Entra ID (formerly Azure AD) as OIDC provider requires this property to be set toall. -
the
principal-attributevalue indicates the OIDC Tokens attribute/claim to use to be considered as user identifier in the client application. It should match the username in Bonita. Possible values are:sub,preferred_username,email,name,nickname,given_name,family_name,middle_name,profile. Using another claim is also possible as long as it is not part of the specified OIDC token standard claims (which are reserved). If the OIDC provider defines a custom claim whose value matches the username of Bonita accounts, just use this claim’s name as value forprincipal-attribute. -
public-clientneeds to be set tofalseif the OIDC provider requires the client requests to be authenticated (with a client secret for example). In this case you also need to use thecredentialsproperty. If this property is set totrue, then no client Authentication header will be sent to the OIDC provider. -
enable-corsis required only if you want to be able to use Bonita REST API from a web application located on a different domain from your Bonita installation’s. It comes with additional optionscors-max-age,cors-allowed-methods,cors-allowed-headers,cors-exposed-headersandcors-allowed-origins. You can check the Keycloak client adapter config documentation for more information. -
credentialsdefines the authentication method used for token requests to the OIDC provider when Bonita client is configured with a confidential access type to the OIDC provider (public-clientis set tofalse). You can set this property with an object containing just asecret(in this caseclient_secret_basicauthentication method is used) or, since Bonita 2022.1-u6, you can specify the authentication method explicitly (for older versions see the Keycloak client authentication documentation for the configuration of this property). Supported keys are:client-secret-basic,client-secret-post,client-secret-jwt(orsecret-jwt),private-key-jwt(orjwt). Here are some examples:"credentials" : { "secret" : "****" }"credentials" : { "client-secret-post": { "secret" : "****" } }"credentials" : { "client-secret-jwt": { "secret" : "****" "algorithm": "HS512" } }"credentials" : { "private-key-jwt": { "client-keystore-file": "classpath:keystore-client.jks", "client-keystore-type": "JKS", "client-keystore-password": "storepass", "client-key-password": "keypass", "client-key-alias": "clientkey", "token-expiration": 10 } } -
Some additional properties not present in the default file can be useful:
-
discovery-urlif the OIDC provider supports the OIDC discovery specification, this property can be used to configure the discovery endpoint URL (".well-known") to retrieve the provider’s endpoint locations (since Bonita 2022.1-u1). It can replace the 6 propertiesauth-url,token-url,logout-url,token-issuer-uri,user-info-urlandjwks-url. This property is specific to Bonita OIDC module and is not supported/documented by Keycloak. -
connection-pool-sizefor the pool of connection to the OIDC provider server (20 by default) -
truststorepath to a truststore file for OIDC provider servers requiring HTTPS. It should contain one or more trusted host certificates or certificate authorities. You can create this truststore by extracting the public certificate of the OIDC server’s SSL keystore. This property is mandatory if you OIDC provider requires HTTPS unless you setdisable-trust-managerproperty totrue. If the truststore requires a password, you also need to add the propertytruststore-password. -
client-keystorepath to a keystore file containing client certificate for two-way SSL when the OIDC client adapter makes HTTPS requests to the OIDC provider server. You also need to add the propertiesclient-keystore-password(password for the client keystore) andclient-key-password(password for the client’s key). -
verify-token-audiencecan be set totrueto verify, when accessing the REST API with a Bearer authentication, that the access token audience (audclaim) contains the client Id (resourceproperty). In Authorization Code Flow, this verification is always done and cannot be disabled. -
confidential-portcan be used to force the port in the redirect-uri sent to the OIDC provider when exchanging a code for a token (setting the value of this property to 443 when Bonita is accessed via HTTPS (ssl-requiredis set toallorexternal) will result in the port not being added to the redirect-uri. This can help to avoid having a port 0 wrongly added to the redirect-uri). -
redirect-rewrite-rulescan be used to modify the path section of the redirect URI sent to the OIDC provider with the authentication or code exchange requests. By default the URI sent is the request URI as seen by Bonita OIDC module, but if Bonita is behind a reverse proxy for example, the path of the URI seen by Bonita OIDC module may be the one of the internal URI used by the reverse proxy and not the one of URI the OIDC provider needs to redirect the user agent (web browser) to. The value of this property is an object where each attribute key is a regular expression to which the Redirect URI path is to be matched and the attribute value is the replacement String. The other parts of the URI like the protocol, domain, port or query string cannot be modified. Here is an example removing "/bonita" from the redirect URI:"redirect-rewrite-rules" : { "^/bonita/(.*)$" : "/$1" }
-
-
|
Additional configuration options are available in Keycloak official documentation |
Once your Identity Provider is correctly configured (see the section Configure the Identity Provider), test the access to any Bonita Application page, an app page or a form URL (or just http://<host>:<port>/bonita) and make sure that you are redirected to your Identity Provider to log in (unless you are already logged in).
Note that if you try to access http://<host>:<port>/bonita/login.jsp, then you won’t be redirected to the OIDC provider’s authentication end point since this page needs to be accessible for the technical administrator (or another user if you set the property oidc.auth.standard.allowed to true) to be able to log in without an account on the Identity Provider.
|
If your Bonita platform is behind a reverse proxy or a load balancer, You need to make sure : X-Forwarded-Proto: https
X-Forwarded-Host: your.bonita.external.url.host
In order for Tomcat server to use those headers, you can use Tomcat’s RemoteIpValve. Edit In addition, you can add some log to diagnose received headers in More information can be found in Tomcat official documentation Remote_IP_Valve and Access_Log_Valve |
Configure the Identity Provider
Your OIDC identity provider (IdP) should declare an OIDC Service Provider named (or whose client Id is) bonita or the value of the resource property set in the file keycloack-oidc.json of Bonita bundle if it is different, with the following configuration or the equivalent depending on your IdP:
    "clientId": "bonita",
    "clientSecret": "your client secret",
    "baseUrl": "<your bonita server URL>", (for example http://my.company.domain:8080/bonita)
    "adminUrl": "<your bonita server URL>/keycloak", (for example http://my.company.domain:8080/bonita/keycloak)
  this URL is used by the server to communicate directly with Bonita service provider (to push revocation policies for example))
    "clientAuthenticatorType": "client-secret", (can also be "signed JWT" or "signed JWT with client secret" depending on your use case and security policies)
    "redirectUris": [
      "http://my.company.domain:8080/*" (those are the valid redirect URLs)
    ],
    "bearerOnly": false,
    "publicClient": false,
    "consentRequired": false, (or true if you want the users to have to consent if a third party app uses Bonita REST API for example)
    "standardFlowEnabled": true, (this is for the authorization code flow)
    "implicitFlowEnabled": false, (Bonita OIDC module does not support implicit flow)
    "directAccessGrantsEnabled": true, (or false if you don't want to use the Resource Owner Credentials Grant type to access the REST API)
If you use "Signed JWT" as the method of authentication for your bonita client, you must either provide the public key or the certificate of the Bonita server to the OIDC provider or a JWKS URL where the OIDC provider can download the client’s public keys. Bonita OIDC module provides this service at the following URL: "http://my.company.domain:8080/bonita/k_jwks"
You may also define some access or ID token signature and encryption mechanism. In this case, make sure to update Bonita bundle configuration file keycloack-oidc.json accordingly.
|
If the IdP declares a redirect URI, it might override the target URL ( |
Configure logout behaviour
If your Bonita platform is configured to manage authentication over OIDC, when users log out of Bonita Runtime, they do not log out of the OIDC Identity Provider (IdP). Therefore, they are not logged out of all applications that are using the OIDC provider. To avoid this, you have two options :
Hide the logout button of the Bonita Layout
This is the most commonly used solution. Users are logged in as long as they don’t close their web browser and their session does not time out.
To do this, set the logout.link.hidden option to true in authenticationManager-config.properties located in <BUNDLE_HOME>/setup/platform_conf/initial/tenant_portal for not initialized platform or <BUNDLE_HOME>/setup/platform_conf/current/tenant_portal.
|
When a user logs out from the IdP directly, Bonita Runtime’s session will remain active. The user’s session time to live will be reset to the configured session timeout value upon each user interaction with the server. |
Setup Bonita platform for OIDC logout
RP-Initiated logout allows to log out from the OIDC provider as well as all the registered Service Providers when logging out from Bonita platform. This is required for example if users are on public computers. As OIDC Providers do not necessarily support OpenID logout and have different ways of handling it, Bonita only offers OIDC logout through an OIDC logout endpoint URL that the OIDC provider should provide and support. To setup Bonita for OIDC logout:
-
Set the value of the property
oidc.logout.urlwith your OIDC provider logout endpoint URL inauthenticationManager-config.propertieslocated in<BUNDLE_HOME>/setup/platform_conf/initial/tenant_portalfor not initialized platform or<BUNDLE_HOME>/setup/platform_conf/current/tenant_portal. -
If the logout URL of your OIDC provider supports a parameter to redirect after the logout, you can set the property
oidc.logout.url.redirectQuerywith the query string to use (it will be concatenated to the logout URL). The placeholder{encodedRedirectUri}will be replaced at runtime with the current Bonita URL at the time on the logout action. It is also possible to pass the ID token of the logged in user in the query string using the placeholder{idToken}. This is useful if the OIDC provider supports theid_token_hintparameter of the OIDC RP-Initiated logout specification (since Bonita 2022.1-u2). For this use case, make sure Bonita is configured for HTTPS since the ID token will be sent in the URL.
On the OIDC provider side, you need to configure Bonita OIDC service provider for:
-
either back-channel logout with the URL
<your bonita server URL>/keycloak/k_logout(for example http://my.company.domain:8080/bonita/keycloak/k_logout) and a signature algorithm for the logout token (Logout JWT tokens must be signed). -
or front-channel logout with the URL
<your bonita server URL>/logoutservice/oidc(for example http://my.company.domain:8080/bonita/logoutservice/oidc). Front-channel logout is only supported since Bonita 2022.1-u6. If Bonita and the OIDC provider are not on the same domain, you must make sure the provider adds the session ID (sid) and issuer (iss) parameters to the logout request and you also need to configure the file<BUNDLE_HOME>/setup/platform_conf/current/platform_portal/security-config.propertiesto add the domain of the OIDC provider to the list of authorized frame-ancestors for Bonita applications (front channel logout request are sent in an Iframe by the OIDC provider) as follows:#Content-Security-Policy response header value bonita.runtime.security.csrf.header.content.security.policy=frame-ancestors 'self' https://my.company.oidc.provider:9090;
If the logout flow supported by your OIDC provider is not the same as the ones supported by Bonita platform, the preferred solution to handle it anyway is to intercept the requests to /logoutservice and handle the logout programmatically.
Configure Bonita for multiple OIDC providers
It is possible to configure Bonita to Handle authentication with several OpenID Connect providers. With such a configuration, the user will be able to choose the OIDC provider to use when logging in.
In order to do this, you need to duplicate the file keycloak-oidc.json to have one file keycloak-oidc-<provider ID>.json for each OIDC provider and set the property oidc.providers in the file authenticationManager-config.properties located in <BUNDLE_HOME>/setup/platform_conf/initial/tenant_portal for not initialized platform or <BUNDLE_HOME>/setup/platform_conf/current/tenant_portal. Other properties need to be configured as well in this file:
oidc.providers = provider1,provider2
oidc.provider.query.param = provider
oidc.provider.provider1.displayName = Keycloak
oidc.provider.provider1.logoutUrl = http://provider1.url/realms/bonita/protocol/openid-connect/logout
oidc.provider.provider1.logoutQuery = ?post_logout_redirect_uri={encodedRedirectUri}&id_token_hint={idToken}
oidc.provider.provider2.displayName = Custom provider
oidc.provider.provider2.logoutUrl = http://provider2.url/realms/bonita/protocol/openid-connect/logout
oidc.provider.provider2.logoutQuery = ?post_logout_redirect_uri={encodedRedirectUri}&id_token_hint={idToken}
#bonita.runtime.authentication.providers.url=/bonita/authproviders.jsp
-
oidc.providersis a comma separated list of the ID of the available OIDC providers. When this property is set, the file keycloak-oidc.json is no longer used and keycloak-oidc-<provider ID>.json files are used instead. You can choose the ID you want for each provider, but it is recommended to avoid special characters and whitespaces and keep it short since it will be used in the URLs and the files names. The order of the providers in this list will be the order in which they are displayed in the providers choice page. -
oidc.provider.query.param(optional) is the name of the query parameter to set in the URL to identify the OIDC provider to use to log in. By default, it is set toproviderbut you can change it if you want. When Accessing Bonita with this query parameter in the URL, the users will be redirected to the provider authentication page. When this query parameter is not in the URL they will get the providers landing page (seebonita.runtime.authentication.providers.urlproperty). -
For each provider, you need to set the following properties:
-
oidc.provider.<provider ID>.displayName(mandatory) is the display name of the OIDC provider to use. It will be displayed in the providers list page page when accessing Bonita application without being logged in and without any provider ID in the URL query string. -
oidc.provider.<provider ID>.logoutUrl(mandatory) is the logout URL of the OIDC provider. It is used to log out from the OIDC provider when logging out from Bonita. This property replaces the propertyoidc.logout.urlthat is used when only one OIDC provider is configured. -
oidc.provider.<provider ID>.logoutQuery(mandatory) is the query string to use when redirecting to the OIDC provider logout URL. The placeholders{encodedRedirectUri}and{idToken}will be replaced at runtime with the current Bonita URL at the time on the logout action and the ID token of the logged-in user respectively. This property replaces the propertyoidc.logout.url.redirectQuerythat is used when only one OIDC provider is configured.
-
-
bonita.runtime.authentication.providers.url(optional) can be used to set the URL of the page in which the users will be able to choose which provider to authenticate with. By default (when not specified or commented), internal pageauthproviders.jspis used but you can set it to target an external page (use the full URL of the page since an absolute URL is expected). This external page must be accessible without authentication. The list of providers will be hard-coded in the page and for each provider, the link should target the current redirectUrl query parameter value with the addition of a provider query parameter (e.g.: provider=<provider ID>). This property can also be set using the environment variableBONITA_RUNTIME_AUTHENTICATION_PROVIDERS_URL. -
oidc.auth.standard.allowed(optional) this property controls whether the standard authentication (username/password) is allowed or not (see Configure Bonita Bundle for OIDC). When using multiple OIDC providers and this property is set to true, an additional option to authenticate will be available on the providers list page to navigate to Bonita standard login page.
Other properties of this file should be configured the same way as described in the section Configure Bonita Bundle for OIDC.
|
When configuring front or back channel logout on the OIDC provider, make sure the provider ID is present in the query parameter of Bonita client logout URL (e.g.: |
Manage passwords
When your Bonita platform is configured to manage authentication over OIDC, the user password are managed in your OIDC Provider (IdP). However, when you create a user in Bonita Applications, specifying a password is mandatory. This password is ignored when logging in with the OIDC provider.
LDAP synchronizer and OIDC
If you are using an LDAP service and the LDAP synchronizer to manage your user data,
you can continue to do this and manage authentication over OIDC.
The LDAP synchronizer user must be registered in Bonita (no need for an OIDC account). It is recommended though to use the technical admin account.
We recommend that you use LDAP as your master source for information, synchronizing the relevant information with your Bonita platform.
|
By default, the LDAP synchronizer sets the password of the accounts created with the same value as the username. So, even if you allow standard authentication (by setting the property |
Using Bonita REST API with OIDC
When Bonita web application is configured for authentication with OpenID Connect, Bonita REST API is secured through OIDC too and it is possible to call it with just an OAuth Access token. This means "statelessness" as there is no need for a session between the client and Bonita REST API.
|
Make sure the property |
Authentication
To obtain the access token, there are several options depending on your OpenID Connect provider configuration and your use case:
Resource Owner Credentials Grant
In this scenario, the client application that needs to use Bonita REST API performs a request to the token end point of the OIDC provider with the username and password of the user account to use in Bonita.
For example, using a Keycloak server as OIDC provider, with a realm named bonita and a client ID bonitaOIDC:
  POST /auth/realms/bonita/protocol/openid-connect/token  HTTP/1.1
  Host: localhost:9090
  Content-Type: application/x-www-form-urlencoded

  grant_type:password
  password:<user IdP password>
  username:<user IdP username>
  client_id:bonitaOIDC
The token endpoint of the OIDC provider will answer with an ID and an access token.
Once you obtained the Access token, you can make your REST API request in a normal way, just adding a header Authorization with value Bearer <Access token> (replace the placeholder <Access token> with the token returned by the OIDC provider and make sure to keep the whitespace after Bearer).
Authorization Code Grant
Those scenarios work the same way as when you login into Bonita Runtime except, in this case, it is the client application that uses Bonita REST API which needs to trigger the authentication process by calling the OIDC provider authorization endpoint with Bonita OIDC client as client_id. The rest of the scenario is similar to what is described in the OIDC Authorization Code Flow schema.
For example, if Bonita is configured to use Google’s OpenID Connect endpoint for authentication, then an application that wants to use Bonita REST API will need to delegate authentication to Google to obtain an authorization code for Bonita REST API.
With Authorization Code Flow, once you obtain the authorization code, you can request again the OIDC provider to get the tokens with as grant_type value authorization_code:
  POST /auth/realms/bonita/protocol/openid-connect/token  HTTP/1.1
  Host: localhost:9090
  Content-Type: application/x-www-form-urlencoded

  grant_type:authorization_code
  code:<your code from the OIDC response after user login/consent>
  client_id:<your client ID>
  client_secret:<your client secret>
The token endpoint of the OIDC provider will answer with an ID and an access token.
Once you obtained the Access token, you can make your REST API request in a normal way, just adding a header Authorization with value Bearer <Access token>.
|
If the OIDC provider returns opaque access token (non JWT), then Bonita OIDC client module will use UserInfo OIDC endpoint to validate the token and retrieve the user claims. Make sure the property |
|
When using multiple OIDC providers, the provider ID must be added as a query parameter to the API call URL (e.g.: |
CORS
If you want to call Bonita REST API from a page hosted on another domain than the one of the Bonita server, you need to enable Cross-Origin Resource Sharing (CORS) through Open ID Connect.
Configure Bonita Bundle with OIDC for CORS
In the file keycloak-oidc.json, make sure the property enable-cors is set to true and the properties cors-allowed-methods, cors-allowed-headers, cors-exposed-headers have the correct values. For a basic configuration, you can use the following values:
  "enable-cors": true,
  "cors-allowed-methods": "GET,HEAD,POST,PUT,DELETE",
  "cors-allowed-headers": "content-type,X-Requested-With,accept,Origin,Access-Control-Request-Method,Access-Control-Request-Headers,x-bonita-api-token,authorization",
  "cors-exposed-headers": "Access-Control-Allow-Origin,Access-Control-Allow-Credentials,x-bonita-api-token,content-type",
Additionally, you can configure the cors-allowed-origins property to explicitly specify which origins are allowed to make cross-origin requests:
"cors-allowed-origins": "https://example.com,https://app.example.com",
|
The |
You don’t need to configure any additional CORS filter (which is the way to handle CORS when Bonita web application is not configured for Authentication with OIDC). Also make sure to update the sameSiteCookies policy of the Tomcat server and use HTTPS on your Bonita server.
Configure the Identity Provider
In your OIDC identity provider (IdP) configuration, you should make sure the bonita OIDC Service Provider declares the URLs of the domains where the pages requiring calls to Bonita REST API are hosted (or * if you want to allow all origins) as Allowed CORS web origins.
Troubleshooting
How to troubleshoot?
To troubleshoot SSO login issues, you need to increase the log level to DEBUG for the packages org.bonitasoft, com.bonitasoft, and TRACE for org.keycloak in order for errors to be displayed in the log files bonita.log (by default, they are not).
In order to do that in a Tomcat bundle, you need to edit the file <BUNDLE_HOME>/server/conf/log4j2-loggers.xml.
-
Make sure the following lines are not commented or add them if they are not present (the syntaxe of the line with
class org.keycloakis necessary because of the way some of the loggers are created in Keycloak):
    <Logger level="TRACE" name="org.keycloak"/>
<Logger level="TRACE" name="class org.keycloak"/>-
Update the existing lines (to set the level to
DEBUG):
    <Logger level="DEBUG" name="org.bonitasoft"/>
    <Logger level="DEBUG" name="com.bonitasoft"/>
After configuring OIDC SSO in Bonita, the Bonita login page appears and you are not redirected to the SSO login page.
Possible solution
-
Check all the Bonita configuration settings are correct.
-
Make sure
setup[.sh][.bat] pushhas been executed and the server restarted after the changes. -
Try cleaning the cache and cookies of the web browser.
After logging in on the OIDC provider, you are redirected to Bonita but you get a 403 error.
Potential cause Either Bonita OIDC module does not manage to obtain the access tokens, or you don’t have the required rights to access the page (when trying to display a page of an application without having the required profile for example).
Possible solution Check the logs:
-
If you see a message
failed to turn code into token, it meens you are in the first situation. The next lines in the logs should indicate the origin of the problem. Usually, you will need to update the file keycloak-oidc.json to match the configuration of Bonita client declared on the OIDC provider. For example, you may get the following error in the logs:Unauthorized clientwith as error description:invalid client secret. In this case, just fix the client secret in the file keycloak-oidc.json (and push the new configuration into database using the setup tool). -
If you don’t see any keycloak message, then it probably means the user trying to log in just does not have the required profile to see the application. Go to the profile list page and check the profile associated with the application to make sure the user has this profile.