Set up continuous integration
Learn how to set up a continuous integration (CI) environment for your Bonita projects. CI includes automation of build, deployment, etc.
|
For Enterprise, Performance, Efficiency, and Teamwork editions only. |
|
With Continuous Integration (CI) your processes are continuously built and tested while you are designing them. Collaborating on process design can be enhanced with CI by ensuring the integrity of your processes along the development phase.
You could use any integration server, but this page describes how to use Jenkins, as an example.
Prerequisites
To follow this page, you need to be familiar with:
-
Java-based project development with Maven
-
Subversion version control system use
-
Jenkins CI server installation and configuration
Before you begin, you need the following components available for your CI environment:
-
Bonita Studio Teamwork, Efficiency, Performance, or Enterprise edition: The automated process build feature is not available in the Community edition.
-
A window manager: You need a window manager to use the Bonita Studio process builder.
-
Java: You need Java 8 or above to be installed on the CI server and on your development computer.
-
Maven: This guide provides example Maven-based projects for executing automated tests of your processes. Maven 3 is required on the CI server and the test development computer.
-
Subversion: Bonita Studio enables business analysts and developers to collaborate on process design using a shared Subversion (SVN) repository. This tutorial assumes that you have access to a Subversion server.
-
Jenkins: The Jenkins CI server is responsible for coordinating continuous build and test of your processes.
This tutorial assumes that Jenkins is up and running with Maven and Subversion plugins.
Set up Bonita Studio for CI
There are two stages to setting up Bonita Studio for CI:
-
On your Subversion server, create a shared project that can be accessed by the business analysts and developers working on processes and by the CI tools. After you have create your shared project you may develop your processes in this project and/or import existing processes. Each Bonita Studio user must connect to the repository.
-
Define an environment for configuring processes for CI. This environment will be stored in the shared project together with your process definitions.
The next section assumes that you created an environment called CI.
Create a Jenkins job to build your processes automatically
This section describes how to create a Jenkins job to build your processes automatically. This job will produce Business Archive (.bar) files ready for deployment.
All example scripts given on this page are compatible with Unix-like operating systems.
-
Prepare Bonita Studio on the CI server: Bonita Studio includes a BonitaStudioBuilder script to build processes in a CI environment. Install Bonita Studio as follows:
-
Download the OS-independent package (zip) from the Customer Service Center. For example use BonitaSubscription-7.6.3.zip for version 7.6.3. You must have the same version of Bonita Studio for the shared project and the CI server.
-
Extract the package to a permanent location on the CI server:
$> unzip -d /path/to/BonitaStudio BonitaStudioSubscription-7.6.3.zip -
Install your license (a license must have been requested for CI server):
$> cp license.lic /path/to/BonitaStudio/BonitaStudioSubscription-7.6.3/lic_folder/
You are recommended to install a window manager on the CI server in order to have process diagram screenshots generated along with business archives.
-
-
Create Jenkins job: In Jenkins, create a new job of type "Build a free-style software project". Specify a job name for example "Bonita-BuildProcesses".
-
Configure Jenkins job:
-
Check out your project from Subversion. To do this, configure the "Source Code Management" section to retrieve (check out) your Subversion project. Specify the repository URL, and optionally your local repository. We recommend that you set teh check-out strategy to Use 'svn update' as much as possible.
-
Invoke BonitaStudioBuilder script
Note: only one instance of BonitaStudioBuilder can be executed at a time on a computer.
Add a build step of type "Execute shell" configured with the following content:#!/usr/bin/env sh echo "##### Clean previously generated business archives" rm -Rf $WORKSPACE/process-bars echo "" echo "##### Clean BonitaStudioBuilder workspace before each execution" rm -Rf /path/to/BonitaStudio/workspace echo "" echo "##### Execute BonitaStudioBuilder for all processes" cd /path/to/BonitaStudio/.. ./BonitaStudio/workspace_api_scripts/BonitaStudioBuilder.sh-repoPath=$WORKSPACE/process-repository-outputFolder=$WORKSPACE/process-bars -buildAll -environment=CI echo "##### Package generated business archives" zip $WORKSPACE/process-bars.zip $WORKSPACE/process-bars/*This sample script invokes BonitaStudioBuilder to build all processes from your process-repository using the CI environment.
See the BonitaStudioBuilder documentation for information on script options.Then, share generated business archives as a Maven artifacts One way to make the generated .bar files available to other Maven projects is to install them as Maven artifacts.
The following example installs the processes artifact in the local Maven repository.
The Maven artifact could also be deployed to a centralized Maven repository manager solution.
To do so, add a second build step of type "Invoke top-level Maven targets" configured as follows:Goals: install:install-file Properties: groupId=com.acme.bonita artifactId=process-bars version=1.0.0-SNAPSHOT packaging=zip file=$WORKSPACE/process-bars.zipEventually, archive generated artifact in Jenkins
You can archive the job artifact (generated processes package) in Jenkins.
To do so, add a post-build action of type "Archive the artifacts" and choose to archive the "process-bars.zip" package.
As a result, the generated business archives will be made available for download from Jenkins interface.
-
-
Run the Jenkins job
Run the "Bonita-BuildProcesses" Jenkins job. When it is finished, the Maven artifactcom.acme.bonita:process-bars:1.0.0-SNAPSHOTin installed in the local Maven repository of the CI server. The generated processes package is also available as a job build artifact in Jenkins.
Test your processes automatically
This section contains an example of how to test a process from a given Business Archive. It consists of writing JUnit Test cases using the Bonita Engine Java API.
| In this example, we show only how to test the runtime aspects of a process, using the Java APIs. It is also possible to use cargo to deploy the generated bar file into an application server and then launch Selenium tests to test web aspects of a process. |
For this example we are using a Maven project to write our tests.
-
In your IDE create a new Maven project and share it (for example using SVN or Git).
-
Configure local access to Bonita Engine.
-
As we want to test processes build with a Bonita Subscription edition, you need to configure the required Maven artifacts. You should also check that there is a valid license file in
${bonita.client.home}/and the System propertybonita.client.homeset to this folder path. -
We recommend that you write your test cases in the src/test/java folder of your project and put all related resources (Bar files, organization file…) in src/test/resources.
-
Before installing your processes load the relevant organization (regarding your actor mapping). You may have to export your organization from a Bonita Studio: Menu Organization > Export, Select your Organization.
For example:
private void installOrganization() { File organizationFile = new File(MyTestCase.class.getResource("/ACME.xml").getFile()) String organizationContent = getFileContent(organizationFile) getIdentityAPI().importOrganization(organizationContent) } -
Then as a basic test, we try to deploy each generated processes. For example:
@Test
void deploy() throws Exception {
    // Retrieve automatically generated bars as a Map<filename, fileContent>
    Map<String, InputStream> bars = getBars()
    Assert.assertTrue("No bar found in resources", !bars.isEmpty())

    // For each bar deploy and enable it
    for(Entry<String, InputStream> entry : bars.entrySet()) {
        BusinessArchive archive = BusinessArchiveFactory.readBusinessArchive(entry.getValue())
        final String entryKey = entry.getKey()
        ProcessDefinition definition = getProcessAPI().deploy(archive)
        final long defId = definition.getId()
        Assert.assertNotNull("Failed to deploy "+entryKey, definition)
        getProcessAPI().enableProcess(defId)
        getProcessAPI().disableProcess(defId)
        getProcessAPI().deleteProcessDefinition(defId)
    }
}
Now configure a job to run this simple test case on your CI (these steps assume you have shared your generated processes as a Maven artifact, so you can use the maven-dependency plugin to retrieve the latest built processes):
-
Create a new freestyle job in Jenkins
-
Configure the source code management to retrieve your Maven project.
-
Add a build step
-
Select "Invoke top-level Maven targets"
-
Use following Goal: org.apache.maven.plugins:maven-dependency-plugin:2.7:get
-
In properties, set the following:
-
version=1.0.0-SNAPSHOT
-
dest=$WORKSPACE
-
groupId=com.acme.bonita
-
artifactId=process-bars
-
packaging=zip
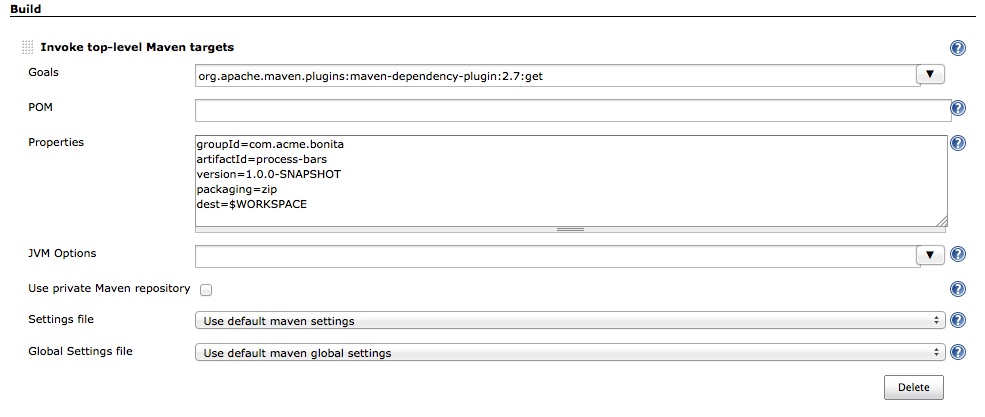
-
-
Then add another build step to unzip the artifact. Select "Execute shell", and use the command
unzip process-bars-1.0.0-SNAPSHOT.zip -d project/src/test/resources.
-
Finally, add another Maven 3 build step to build the test project:
-
Goals: clean install

You may want to publish the JUnit report:
-
Add a post build action -> Publish Junit test result.
-
Set the path
project/target/test-reports/*.xml.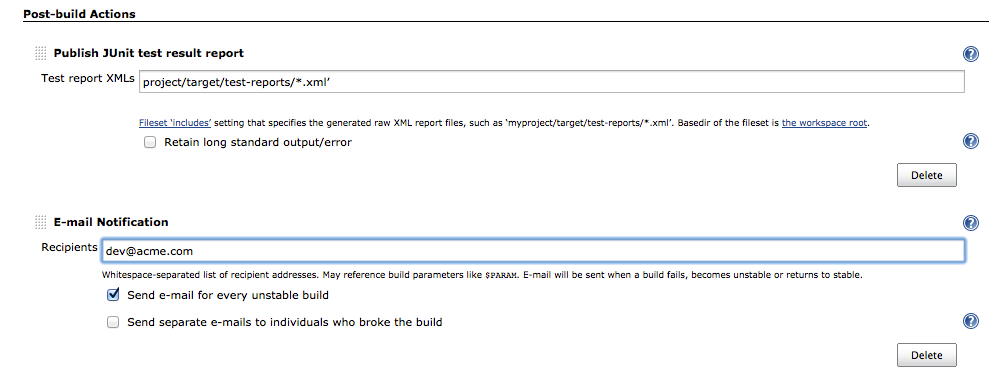
-