Bonita actor filter archetype
A set of best of breed tools to develop and test custom actor filters independently of the Bonita Studio.
Create a custom actor filter
Bonita offers the possibility to create and plug custom actor filters, to allow you to fine tune the potential candidates for a task.
We provide a maven archetype to help you bootstrap an actor filter project. The source code of the archetype is available here.
Prerequisite
-
Java 8 must be installed: https://adoptopenjdk.net/index.html
-
Maven must be installed: https://maven.apache.org/install.html
-
Actor filter development requires some software development skills. The archetype offers the possibility to develop the connector in Java, Groovy or Kotlin. Make sure that you are comfortable with at least one of those three languages.
Generate the project using the maven archetype
A maven archetype is a maven project templating toolkit. This archetype allows you to bootstrap a Bonita actor filter project on your file system. A Bonita actor filter project is a maven project. It can be built, tested and then imported into a Bonita project using Bonita Studio.
To create your actor filter project, prompt a terminal and enter the following command:
|
Make sure that you are not executing the command from an existing maven project. |
mvn archetype:generate -DarchetypeGroupId=org.bonitasoft.archetypes -DarchetypeArtifactId=bonita-actorfilter-archetype -DarchetypeVersion=1.0.0You’ll then have to specify interactively the properties of your project:
-
groupId: the group id of your connector.
-
artifactId: the artifact id of your filter
-
Must match the following regex:
^[a-zA-Z0-9\-]$+ -
Example: my-custom-filter
-
-
version: the version of your connector (default value: 1.0-SNAPSHOT) Follow the maven naming convention guide
-
package the package in which the connector source files will be created (default value: the group id of the connector)
-
bonitaVersion: the targeted Bonita version
-
A Bonita connector project depends on org.bonitasoft.engine:bonita-common. To avoid potential conflicts / errors at runtime, you should use the Bonita version of your runtime environment.
-
-
className: the class name of your connector
-
Must match the following regex:
^[a-zA-Z_$][a-zA-Z\d_$]$+(A Java classname valid identifier) -
Example: MyCustomFilter
-
-
language: the language used in the connector project. Available values:
-
java
-
groovy
-
kotlin
-
-
wrapper (optional): install a Maven wrapper. Available values:
-
true (default)
-
false
-
A folder named [your artifact id] is created, with your Bonita actor filter project, ready to use.
|
You can avoid the interactive mode by specifying all properties of your project directly in the command line, but by doing that you’ll bypass the validation performed on the properties content. |
Actor filter development
In this section we’ll look into the different components of an actor filter project, and how you should use them to develop your filter.
Definition
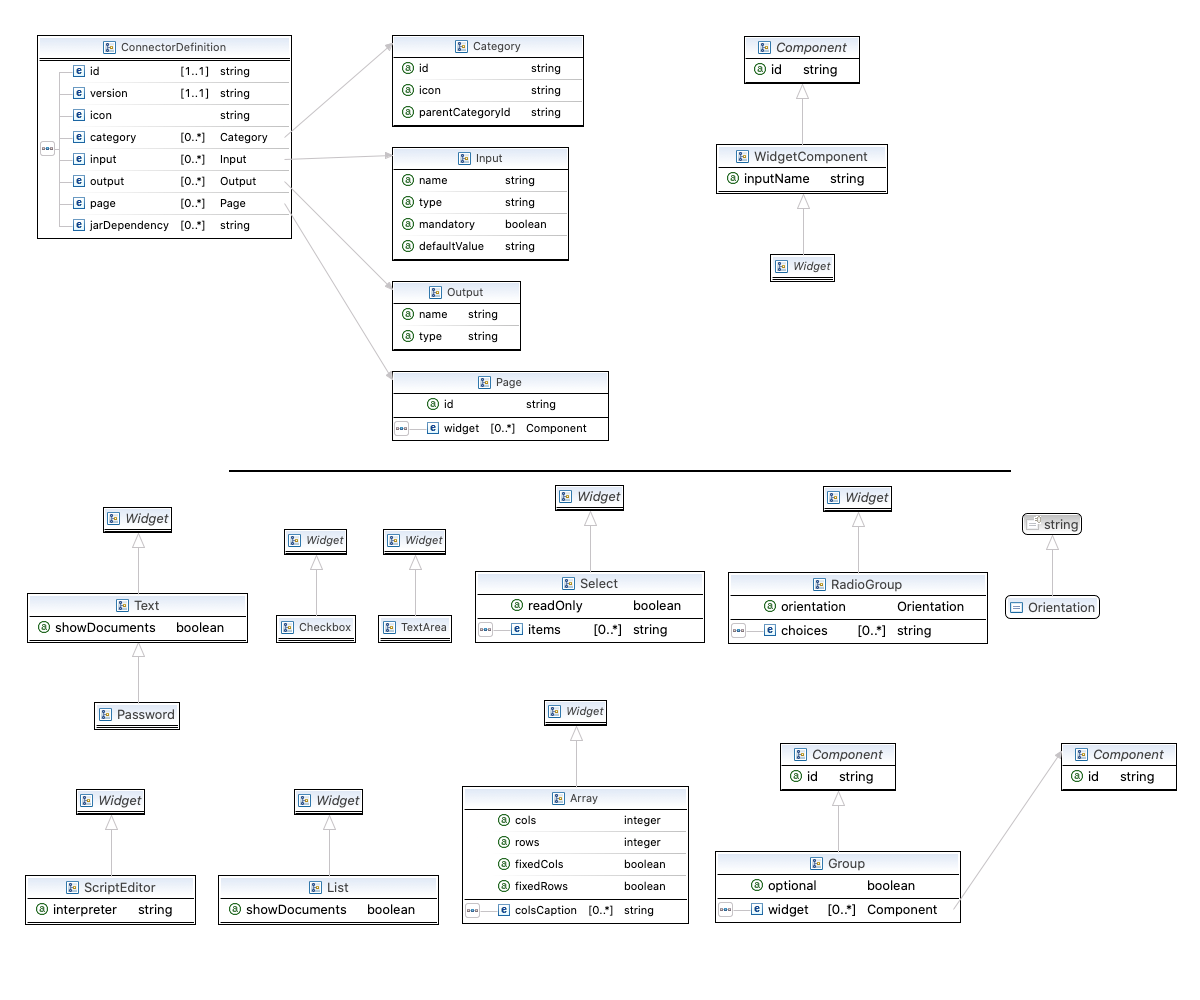
An actor filter is first defined by its definition. It is an XML file located in src/main/resources-filtered/[artifactId].def by default.
A definition defines the inputs of an actor filter. It can be seen as a contract. Then, implementations of this definition can be created, they just need to respect the inputs contract of the definition.
The connector definition XSD is available in schemas/connector-definition-descriptor.xsd (it is the same for definition model for Connectors and Actor filters definitions), you can import it in a IDE to get completion.
Example:
<?xml version="1.0" encoding="UTF-8"?>
<definition:ConnectorDefinition xmlns:xsi="http://www.w3.org/2001/XMLSchema-instance" xmlns:definition="http://www.bonitasoft.org/ns/connector/definition/6.1">
    <id>${definition-id}</id> <!-- Id of the definition -->
    <version>${definition-version}</version> <!-- Version of the definition -->
    <icon>icon.png</icon> <!-- The icon used in the Studio for this definition -->
    <category icon="icon.png" id="Custom"/> <!-- The category of this definition, used in the Studio (e.g: http, script ...) -->

    <!-- Connector inputs -->
    <input mandatory="true" name="defaultInput" type="java.lang.String"/>

    <!--
       Pages and widgets to use the connector in the Bonita Studio.
       - Each widget must be bound to an input
       - Page titles must be defined in the properties files
       - Widget labels must be defined in the properties files
       - Page and widget descriptions can be defined in the properties files (optional)
    -->
    <page id="defaultPage">
        <widget xsi:type="definition:Text" id="defaultInputWidget" inputName="defaultInput"/>
    </page>

</definition:ConnectorDefinition>
definition-id and definition-version are properties defined in the pom.xml.
Actor filter Inputs
The inputs of an actor filter are defined in the definition. Those inputs are valued by processes, and are retrieved by the implementation classes of the actor filter to execute the business logic.
A actor filter input:
-
Has a name
-
Has a type
-
Has an optional default value
-
Can be mandatory
Pages and widgets
A definition includes pages and widgets. Those elements define the UI that will appear in the Bonita Studio to configure the actor filter.
-
A widget is bound to an input
-
A page contains a set of widgets
The idea is to create pages for related inputs, so the person who will configure the actor filter will easily understand what he has to do.
All the available widgets are defined in the XSD. You must reference the widget type in the tag to create a specific widget:
<widget xsi:type="definition:[WIDGET TYPE]" id="[WIDGET ID]" inputName="[CORRESPONDING INPUT]"/>The widget id is used in the .properties files to define and translate the widget name and the widget description.
The input name is used to bind this widget to one of the connector inputs.
Some widgets can require additional informations. For example, if you want to create a select widget with a set of item to select, you will have to do something like that:
<widget xsi:type="definition:Select" id="choiceWidget" inputName="choice">
    <items>Choice 1</items>
    <items>Choice 2</items>
    <items>Choice 3</items>
</widget>Actor filter implementation
An actor filter implementation implements a definition. A definition defines a set of inputs, implementing a definition means use the provided inputs to create the expected list of users ids.
Several implementations can be created for a given definition.
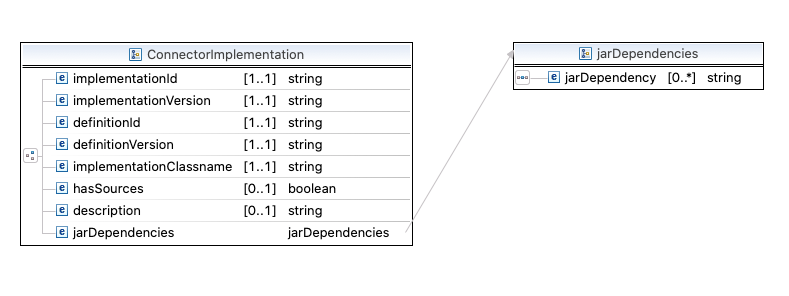
An actor filter implementation is made of two elements:
-
An xml file used to explicit the definition implemented, the dependencies required and the name of the implementation class
-
A set of Java based classes, constituting the implementation sources
Implementation XML file
The implementation XML file is located in src/main/resources-filtered/[artifactId].impl by default.
The implementation XSD is available in schemas/connector-implementation-descriptor.xsd, you can import it in a IDE to get completion.
Example:
<?xml version="1.0" encoding="UTF-8"?>
<implementation:connectorImplementation xmlns:implementation="http://www.bonitasoft.org/ns/connector/implementation/6.0">
  <implementationId>${impl-id}</implementationId> <!-- Id of the implementation -->
  <implementationVersion>${impl-version}</implementationVersion> <!-- Version of the implementation -->
  <definitionId>${definition-id}</definitionId> <!-- Id of the definition implemented -->
  <definitionVersion>${definition-version}</definitionVersion> <!-- Version of the definition implemented -->
  <implementationClassname>${impl-main-class}</implementationClassname> <!-- Path to the main implementation class -->
  <description>Default ${definition-id} implementation</description>

<!-- retrieved from the pom.xml at build time -->
${impl-dependencies}

</implementation:connectorImplementation>impl-id, impl-version, definition-id, definition-version and impl-main-class are properties defined in the pom.xml.
impl-dependencies is replaced at build time using src\script\dependencies-as-var.groovy script.
Implementation sources
The implementation sources contain all the logic of the actor filter:
-
The validation of the inputs
-
The execution of the business logic to filter the users for a given actor.
The archetype offers the possibility to generate the default sources in Java, Groovy or Kotlin. The build result will always be a Java archive (jar) and some Zip archives (assemblies), no matters the language selected.
The entry point of the implementation sources must extend the AbstractUserFilter class or implement UserFilter interface.
Build the project
Build the project by typing the following command at the root of the project:
./mvnw clean installA actor filter project is built using Maven, and especially the maven assembly plugin.
The default build output is:
-
target/[artifact id]-[artifact version]-all.zip: By importing this archive in a Bonita Studio you will import all the definitions and implementations created in the project. -
target/[artifact id]-[artifact version]-impl.zip: An archive containing a single implementation.