Applications
This page defines the term "Application" and explains what a user can see and do about them in the Bonita Administrator Application.
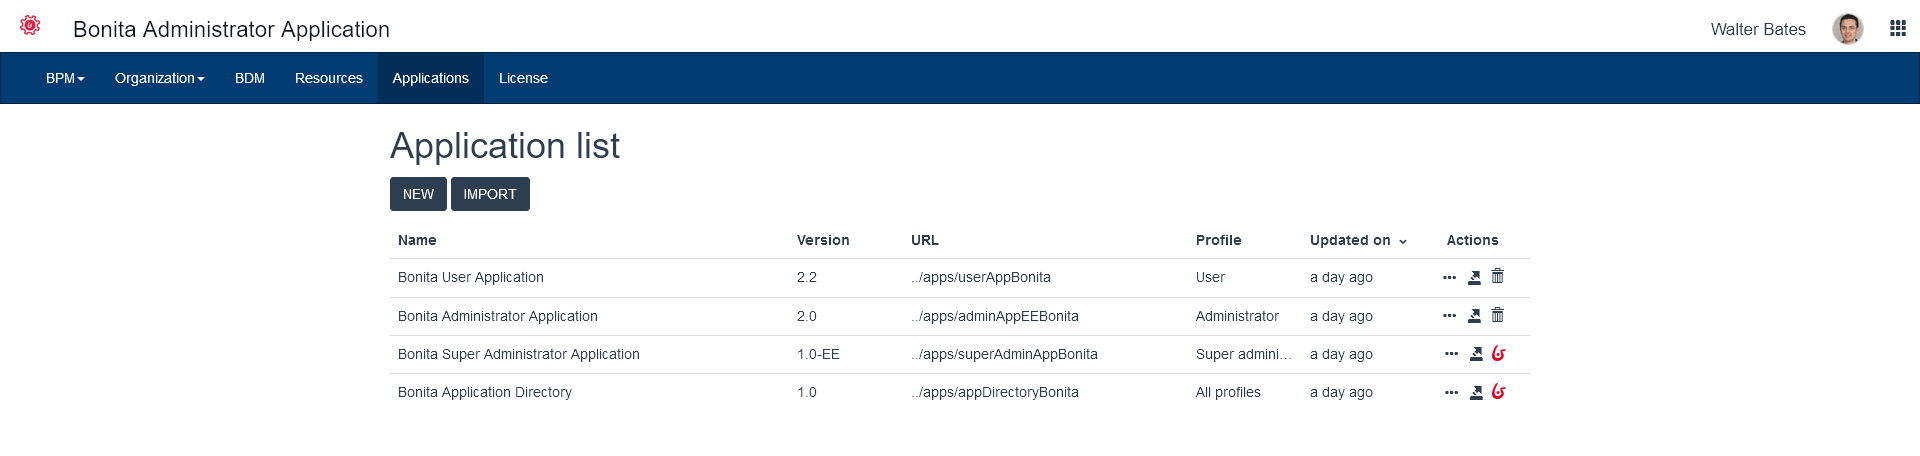
Here is a view of the page:
Application definition
Bonita allows companies to build business and process-centered web applications that provide access to operational dashboards and pages.
An application is a collection of pages and processes that meets a business need. It contains some or all of the following:
-
Pages and Forms: the user interface components of the application. An application must contain at least one page.
-
Processes: the logic execution components of the application. An application must contain at least one process. A process can contain forms, which are the user interface of the process.
-
Data: the business information created, transformed, and/or deleted by the processes, and presented in pages and forms.
-
REST API extensions: called from pages or forms to retrieve data to be presented to the user.
-
Layout: the frame in which application pages are displayed.
-
Theme: the appearance of application pages, including fonts and colors.
Application prerequisites
An application requires the following to be available:
-
The Business Data Model (BDM) must be deployed
-
The organization data must be deployed, so that application users can log in.
-
The access authorizations that grant users access to the application resources must be defined.
Application creation
Even though you can create applications from the Bonita Administrator Application, these would not be taken into account in Bonita Studio nor the project sources.
So we strongly encourage your team to create applications in Bonita Studio.
Application management
When a Bonita project is deployed on a Bonita Runtime, what you see in the Administrator Applications section is the list of deployed applications, links to their URL, access to their details, as well as the option to export or delete them.
URL of an application
When clicking on a URL, the application opens in another tab of your web browser.
To access the application content, you must pertain to the profile mapped with the application.
If this is the case, you will not be taken to the login page and will directly land on the application home page.
Details of an application
When navigating to this page, the Administrator can view what layout and theme a linked with the application, but also all pages used by the application as well as the navigation structure.
There is no view of the processes used in the application, nor the Business Data Model, nor the organization.
An Administrator must check that all these required elements are available in the Bonita Runtime so the application runs smoothly.
To do so, click on BPM>Processes, Organization, and BDM.
Export an application
Because the application has been modified in Live Update (see below), you may need to export in so it can be imported in Bonita Studio and contribute to a new project version to store in a Version Control System (Git), share, and eventually deploy, to ease the maintenance of the whole project.
To do so, click on the Export icon at the right of the row for the application to export.
Delete an application
Deleting an application is a very critical operation to conduct on Non-Production or Production environments. So we advise not to do so from the Bonita Administrator Application, but rather in Bonita Studio, so this major project edition is saved in a new version of the project and shared with the project team. Still, to delete an application, click on the _Delete- icon
Live update
In the details page of an application, you can Live Update the elements mapped with the application descriptor:
-
the layout
-
the theme
-
the list of pages used in the application
-
the navigation
To map new resources, you need to make sure that they have been installed first. To do so, go to Resources and add what needs to be.
Updating the layout
Each application is associated with a layout that defines the main frame of this application. To change the application layout:
-
Click on the Edit icon for the application you want to edit. The application details page is displayed.
-
In the "Look & Feel" zone, click on the name of the current layout.
-
Choose the new layout from the drop down list.
-
Click on the "Tick" button.
Updating the theme
Each application is associated with a theme that defines the application appearance. All pages developed with the UI Designer will automatically benefit of application theme.
To update the application theme:
-
Click on the Edit icon for the application you want to edit. The application details page is displayed.
-
In the "Look & Feel" zone, click on the name of the current theme.
-
Choose the new theme from the drop down list.
-
Click on the "Tick" button.
Updating the page list
To update the pages:
-
Click on the Edit icon for the application you want to edit. The application details page is displayed.
-
In the "Pages" list, you can:
-
Add a page by clicking on Add and choosing a page from the popup list, and define the URL token for this page.
-
Remove a page by clicking the Delete icon for that page.
-
Change the home page: in the page list, click the Home icon on the row of the relevant page.
-
| When you define the URL token for a page, you cannot use "API","content" or "theme" (case insensitive). Those words are reserved for internal use. |
Updating the navigation
The navigation defines the menu names and structure, and the pages that menu items point to. The menu hierarchy is limited to two levels, for usability. At the top level, you can specify two types of items:
-
A one-page menus is clickable and points to a page.
-
A multi-page menu is not clickable but is the container for a collection of one-page menu items.
To update the navigation:
-
Click the Edit icon for the application you want to edit. The application details page is displayed.
-
In the Navigation zone, at top level, you can define one-page menus that point directly to pages (like Home in the illustration), or multi-page menus (like Holidays).
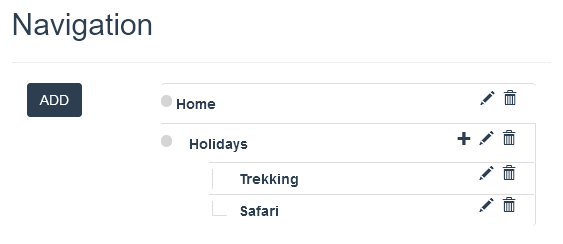
If you define a multi-page menu, you can add menu items (like Trekking and Safari).
-
To add a top-level one-page menu, click on Add, then in the popup, click One-page menu, specify the name for the menu, select the page, and click on Add.
-
To add a top-level multi-page menu, click on Add, then in the popup, click on Multi-page menu, specify the name for the menu, and click on Add.
-
To add an item to a multi-page menu, click the plus icon beside the menu name, specify the name for the menu item, choose the page from the popup, and click on Add.
-
To delete a menu or menu item, click the Delete icon. If you delete a menu that has children, the child entries are automatically deleted from the navigation.
-
To reorder menu items, drag and drop them.
Deploy an application
To deploy an application, import the following in this order:
-
Organization then profiles
-
API extensions then pages, layout, themes
-
Business Data Model then processes
-
Application descriptor
Export an application
To export an application:
-
Select the application you want to export.
-
Click on the Export icon.
An XML file, Application_Data.xml, is exported.
When you export an application, it includes the following:
-
The application metadata
-
The layout name
-
The theme name
-
The navigation definition
-
The mapping of pages to the navigation
It does not include the pages, layout, or theme themselves, the business data model, the profile definition, the processes, the organization, or the authorization settings. These must all be deployed separately.
Import applications
When you import an application, you import the mapping of the application to pages. For the import to be successful, any pages, layout and theme must already be loaded. If you are setting up a new production environment by importing all the data, import it in the following order:
-
organization
-
profiles
-
API extensions
-
pages
-
layouts
-
themes
-
business data model
-
processes (including forms)
-
applications
You will also need to apply any custom authorization definitions.
To import applications:
-
Go to the Applications page. The list of applications is displayed.
-
Click Import.
-
Specify the
Application_Data.xmlfile to upload. -
Click Import.
The file is imported and checked. A popup reports the status of the import. It shows the number of applications successfully imported, partially imported, or with errors. If the profile associated with an application is not defined, the application is created without any associated profile. If a page associated with the application is not present, the application is created without this page or the related navigation elements. If the specified layout and/or theme is not present, the application is created with the default layout and theme.
Updating an application
There are two aspects to updating an application: changing the application definition and changing the resources.
Updating an application definition
-
In the menu bar, click Applications. The Applications list page is displayed.
-
Click the Edit icon (…) for the application you want to edit. The application details page is displayed. From this page, you can edit the application metadata, layout, theme, pages, and navigation.
-
To edit the metadata, click the Edit button. In the popup, modify the information about the application, then click Save.
-
To edit the layout, see Specifying application layout.
-
To edit the theme, see Specifying application theme. Note that the end user will see this modification with a delay (due to the cache policy)
-
To edit the pages, go to the Pages zone. You can add a page by clicking Add. You can remove a page by clicking the trashcan icon for that page. Note that if you remove a page, the related menu items are automatically removed from the navigation.
-
To edit the navigation, go to the Navigation zone. You can add a menu or menu item by clicking Add. You can remove a menu or menu item by clicking the trashcan icon for that page. You can reorder menus and menu items by dragging and dropping them.
-
Updating application resources
Some resources of an application can be updated live without needing to stop the processes or require users to log out of the application. Live update is primarily intended for rapid deployment of updates in a pre-production test environment. It can be used to deploy updates in a production environment, but in most production environments applications and their components are versioned, so a planned roll-out is more typical.
You can use live update for the following resources: