Start building an application: draw a BPMN process diagram
Now that you have your development environment (i.e. Bonita Studio) up and running, you are ready to start building your first Bonita Living Application.
In this tutorial you will build a claims management solution. Making sure that claims are handled and answered in a timely manner by the appropriate employee(s) can be key to customer satisfaction. It is also a good fit for a process-based application that uses automation. We will of course drastically simplify the application in this tutorial so you can focus on learning about Bonita and not about claims management!
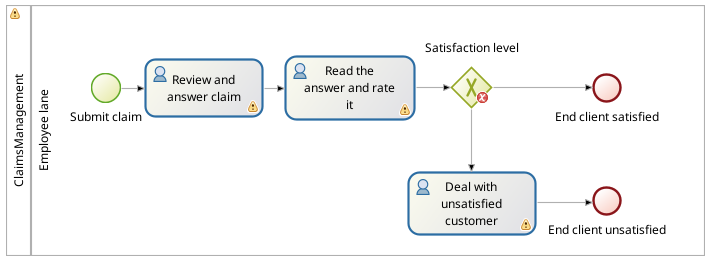
Here is an overview of process execution:
-
The process will be started by a customer who submits a claim, which is a simple text description in our example
-
Next, an employee will review the claim and provide an answer
-
The customer will be able to review the employee's answer and provide a satisfaction rating
-
If the rating is equal to or greater than 3, the process will finish after the customer has read the answer
-
If the rating is lower than 3 an extra task will be assigned to the manager of the employee to work with this customer who is not really satisfied. The manager will be notified by email that a task Deal with unsatisfied customer requires their attention.
-
Once this task is done the process will be completed
|
To design this process we will use the Business Process Model and Notation (BPMN) standard. You don’t need to learn everything about BPMN to follow this tutorial but, if you would like to know more, you can read the Ultimate Guide to BPMN 2.0. |
|
We will use an iterative approach in the process development. This means that in the first iteration, we will have a few limitations:
As we introduce data in our process definition and configure actors, a user will be able to input data in web forms, the process will follow paths that depend on data values, and different users will be involved. |
Create the process diagram
The first step is the design of the process "happy path."
|
While drawing the model, you will use and learn about some basic BPMN elements used in most process diagrams:
|
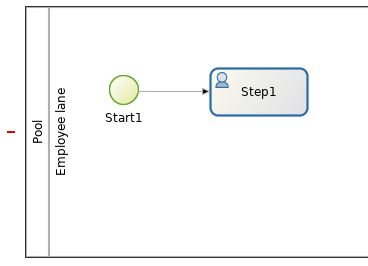
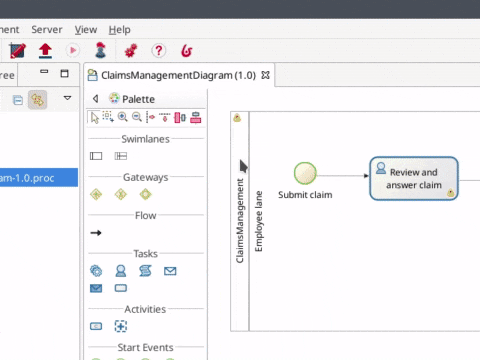
Create a new diagram:
-
In the Bonita Studio menu, click on .
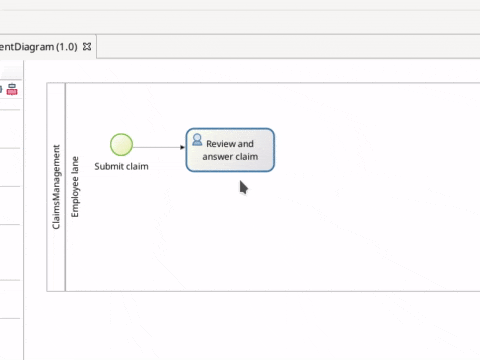
The new diagram includes:
-
One pool: one process definition
-
One lane inside the pool: lane default name is Employee lane (more about lanes in another chapter)
-
A start event: the starting point of process execution
-
A user task: a task (or step) that needs to be performed by a user
and it should look like this:
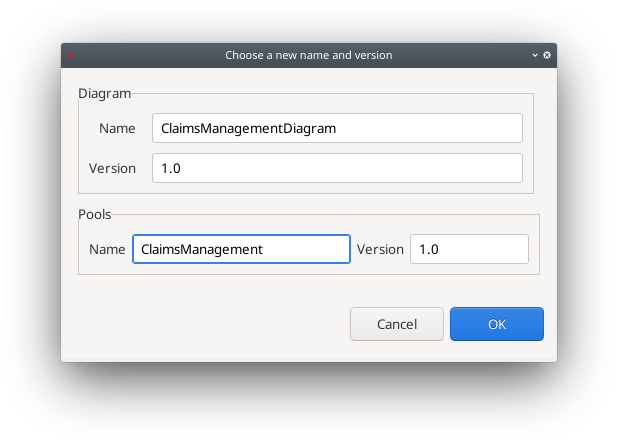
Rename the diagram and the pool:
-
In the Project explorer on the left-hand side of the Bonita Studio window, select the diagram MyDiagram-1.0.proc
-
Right click and select Rename…
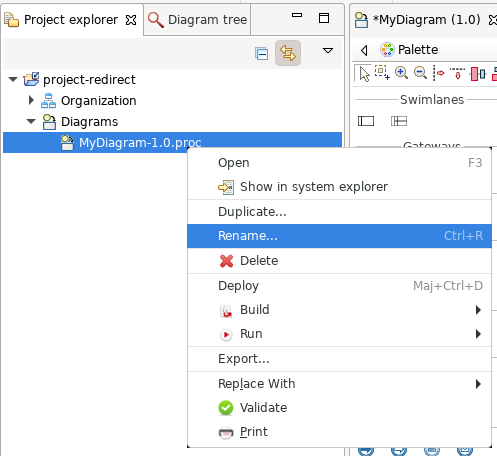
-
In the pop-up window, enter the new name for the diagram: ClaimsManagementDiagram, and for the pool: ClaimsManagement
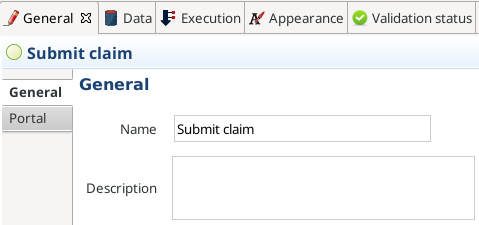
Rename the start event (i.e. the green disc on the left hand side of the process):
-
Select the start event in the diagram
-
At the bottom of the Bonita Studio screen, go to the tab
-
Edit the Name attribute and set the value: Submit claim
Also rename the default user task:
-
Select the user task Step1
-
At the bottom of the Bonita Studio screen go to the tab
-
Edit the Name attribute and set the value: Review and answer claim
Add another task to the process:
-
Select the Review and answer claim task
-
At the border of the selected task, click on the task icon and drag and drop it onto the diagram
-
Make sure that the newly added task is selected
-
Click on the toolbox icon
-
Select the user icon
-
Rename the task to: Read the answer and rate it
In order to define another path in the process execution, add an exclusive gateway. This gateway will direct the process execution to a different path based on certain conditions. Adding an exclusive gateway is done in the same way as adding a task:
-
Select the user task Read the answer and rate it
-
Drag and drop the diamond-shaped gateway icon
-
Click on the toolbox icon
-
Change the gateway type from parallel (the one with the + sign) to exclusive (the one with the x sign)
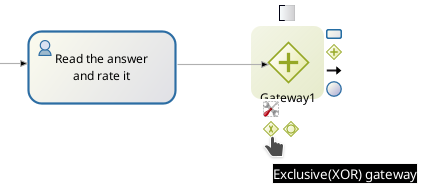
-
Rename the gateway to: Satisfaction level
From the gateway, there are two possibles paths. The first one completes the process if the customer satisfaction level is good. The end of a process is identified by an end event, a red disc. Add the end event in a similar way as adding a task and a gateway:
-
Select the gateway
-
Drag and drop the event icon (the disc icon)
-
Select the end event type (red disc icon)
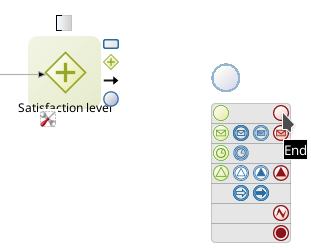
-
Rename the event to: End client satisfied
The second path from the gateway will lead to another user task:
-
Select the Satisfaction level gateway
-
Drag and drop the task icon
-
Click on the toolbox icon
-
Select the user icon
-
Rename the task Deal with unsatisfied customer
And from this Deal with unsatisfied customer task the path will go to a second end event:
-
Select the Deal with unsatisfied customer user task
-
Drag and drop the event icon (the disc icon)
-
Select the end event type (red disc icon)
-
Rename the event to: End client unsatisfied
-
Refresh the diagram validation: at the bottom of the screen, select the Validation status tab and click on Refresh
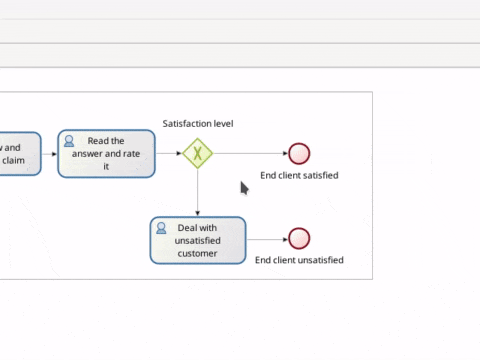
Your process diagram should look like this:
|
Now you can see a validation error on the gateway. The error is displayed because we didn’t define the conditions for process execution when it reaches the gateway. Trying to execute the process will fail because the process execution engine cannot determine which path to follow. |
Configure the conditions required to define the path to follow when executing the process. Conditions are defined on the gateway outgoing transitions (i.e. the arrows going out of the gateway):
-
Select the transition going to the end event
-
Name it to Good
-
Go to the tab
-
Check the checkbox Default flow
|
Default flow means that the transition will be activated only if all other conditions configured on the gateway outgoing transitions are false (boolean value). |
Configure the condition on the transition from the gateway to the Deal with unsatisfied customer task:
-
Select the transition going into the task Deal with unsatisfied customer
-
Name the transition Bad
-
Go in tab
-
In Condition type the value true
-
In the Bonita Studio menu, click on
|
Due to the static value true, this version of the process will always go through the Deal with unsatisfied customer task. |
|
To make the error go away, refresh the diagram validation. At the bottom of the screen, select the Validation status tab and click on Refresh. You should have only five warnings left. |
Congratulations! You have now your first valid BPMN process diagram!
Run the process
You can now build, package, deploy and execute this process definition in the Bonita Studio embedded test environment:
-
Select the process pool, the rectangle shape that includes start events and tasks
-
Click on Run
 in the toolbar at the top of the Bonita Studio window
 -
On the instantiation form, click on Start. The process instance is started and you are redirected to the Bonita User Application task list
-
Move your mouse over the Review and answer claim form on the right hand side of the Bonita User Application and click on Take to "claim" the task
-
Click on the Execute button to actually perform the task and move the process execution forward
-
Click on the Refresh button
 at the top of the task list to update it
 -
Click on the Overview tab on the right side to see the process execution overview form with information about process execution
-
Click on the Form tab to get back to the Read the answer and rate it user task form
-
You can click on Take and execute for both tasks, Read the answer and rate it and Deal with unsatisfied customer, to finish the process execution
-
In the menu, click on Cases

-
Click on the Archived cases tab
-
Click "…" button on the corresponding case to open it
-
Click on the Overview button to display the overview form with information about process execution
|
When you click on the Run button, the process definition and its dependencies are built, packaged and deployed in the Bonita Studio test environment. A user is logged in by default (username: walter.bates, password: bpm) and the auto-generated start form for the process is opened in your web browser. If you submit the instantiation form, it will start a new process instance (or case) and load the user task list in the Bonita User Application. In the task list, you can’t immediately submit a user task because, by default, all users (of the test organization) are candidates to perform the tasks of the process. In order to act on the task you need first to "claim" it, which then makes you the only one - among all the possible candidates - who can do perform an action on it. |
|
You can view process instance information in the Cases section of the Bonita User Application. Switch between Open cases and Archived cases to view the ongoing process instances or see completed ones. Note that if you want to start a second case (i.e. a process instance), you must go into the Bonita User Application Processes menu and click on the Start a new case button (i.e. the "play" icon in the Action column) next to the process definition name. If you click on Run from Bonita Studio, it will clean / overwrite any information related to any process with same name and version, including previous cases. Note that if you did any modifications to your project, you probably want to click on Run to be sure that the latest version is deployed. |
You’ve successfully built and executed your first process. So far it is not very useful as it does not deal with any data and web forms, and only includes a single submit button. In following chapters you will define a business data model and bind it to the process to save information related to the claim submitted by the user.